C++ sysntax
C++ 9 characteristic
Modern C++ introduces various improvements and new features to enhance both performance and code readability. Let’s break down some key aspects of modern C++ syntax, starting with a few major updates from C++11 and onwards:
-
- Auto Keyword
- The
autokeyword allows the compiler to automatically deduce the type of a variable at compile time.
- The
auto x = 10; // int auto y = 3.14; // double auto str = "Hello"; // const char* - Auto Keyword
-
- Range-Based For Loop
- C++11 introduced range-based for loops to simplify iterating through collections.
std::vector<int> v = {1, 2, 3, 4, 5}; for (auto elem : v) { std::cout << elem << std::endl; } - Range-Based For Loop
-
- Lambda Expressions
- Lambda expressions enable inline functions, useful for short, unnamed functions.
auto sum = [](int a, int b) { return a + b; }; std::cout << sum(5, 3); // Outputs 8 - Lambda Expressions
-
- Smart Pointers
- Smart pointers manage the lifecycle of dynamically allocated objects automatically.
- types
std::unique_ptr: Ensures exclusive ownership.std::shared_ptr: Allows multiple ownership.std::weak_ptr: Non-owning reference to an object managed bystd::shared_ptr.
  std::unique_ptr<int> ptr = std::make_unique<int>(42);
  std::shared_ptr<int> sharedPtr = std::make_shared<int>(10);
- Smart Pointers
-5. Move Semantics and std::move
- Move semantics allow resources (e.g., memory) to be transferred rather than copied.
```cpp
std::vector<int> v1 = {1, 2, 3};
std::vector<int> v2 = std::move(v1);  // v1 is now empty, and v2 takes over the data
```
-
- constexpr
- The
constexprkeyword allows the evaluation of functions or variables at compile time.
- The
constexpr int square(int x) { return x * x; } constexpr int result = square(5); // Computed at compile time - constexpr
-
- Structured Bindings (C++17)
- This feature allows you to unpack tuples, pairs, or structs into multiple variables.
std::pair<int, double> p = {1, 2.5}; auto [x, y] = p; // x = 1, y = 2.5 - Structured Bindings (C++17)
-
- std::optional (C++17)
std::optionalrepresents a value that may or may not be present.
std::optional<int> maybeInt; if (maybeInt) { std::cout << *maybeInt; } - std::optional (C++17)
-
- Type Traits and
std::enable_if- Type traits and SFINAE allow template metaprogramming, enabling or disabling certain functions based on type conditions.
template <typename T> typename std::enable_if<std::is_integral<T>::value>::type printIfInt(T t) { std::cout << "Integer: " << t << std::endl; } - Type Traits and
Varaible initialization
C++ offers several ways to initialize variables, with each style evolving over different versions of the language. These initializations cover different data types, from primitive types to user-defined objects. Here’s an overview of the key types of initialization in C++:
-
- Copy Initialization
- This is the simplest and oldest form of initialization in C++. It uses the assignment operator (
=) to initialize a variable.
int x = 10; // Primitive type std::string str = "Hello"; // Class type (std::string)- How it works: The object is constructed first and then assigned a value. This can invoke a copy constructor (for objects).
-
- Direct Initialization
- In this form, the variable is initialized directly using parentheses. It’s more efficient for class types because it avoids the extra step of copy assignment.
int x(10); // Primitive type std::string str("Hello"); // Class type (std::string)- How it works: The object is constructed directly with the specified value, potentially calling a constructor for objects.
-
- List Initialization (C++11)
- Also known as uniform initialization, this was introduced in C++11. It uses curly braces
{}to initialize variables.
- Also known as uniform initialization, this was introduced in C++11. It uses curly braces
- a) Braced Initialization (Direct List Initialization)
int x{10}; // Primitive type std::string str{"Hello"}; // Class type (std::string)-
b) Aggregate Initialization
- For initializing aggregate types (like arrays or structs), you can use brace initialization.
std::array<int, 3> arr = {1, 2, 3}; // Array initialization -
c) Initializer List (std::initializer_list)
- Classes can be initialized with a list of values by providing an initializer list constructor.
std::vector<int> vec = {1, 2, 3, 4, 5}; // Uses std::initializer_list -
Advantages:
- Prevents narrowing conversions (e.g., floating point to integer conversions).
- Offers consistent syntax for initializing different types of objects.
- Reduces ambiguity and potential errors in initialization.
- List Initialization (C++11)
-
- Default Initialization
- When a variable is declared but not explicitly initialized, it undergoes default initialization.
int x; // x is uninitialized (may contain garbage value) std::string str; // Default constructor is called; str is an empty string- Primitive types: Local primitive types are left uninitialized.
- Objects: Objects are initialized via their default constructors.
-
- Value Initialization
-
This is where a variable is initialized to a zero or equivalent default value. For objects, it calls the default constructor, and for primitive types, it initializes them to zero.
-
a) For Primitive Types
int x{}; // Zero-initialization: x is 0- b) For User-Defined Types
std::string str{}; // Default-initialized as an empty string- When it’s used: When you use empty braces (
{}) or parentheses()to initialize a variable, the variable is value-initialized.
-
- Zero Initialization
-
When variables are zero-initialized, their values are explicitly set to zero (for built-in types) or default-initialized (for user-defined types).
-
Zero-initialization occurs when variables are declared as static, as globals, or as members of a class with no constructors. For example:
static int x; // x is zero-initialized to 0 -
- Move Initialization (C++11)
- Move initialization occurs when you use
std::moveto transfer ownership of resources (typically from an object that is no longer needed).
std::vector<int> vec1 = {1, 2, 3}; std::vector<int> vec2 = std::move(vec1); // Moves vec1's resources to vec2- When to use: When the object you’re moving from is no longer needed, so its contents can be transferred rather than copied.
-
- Reference Initialization
- References must be initialized when declared, and they reference an existing variable. A reference cannot be re-assigned once it is initialized.
int x = 10; int& ref = x; // ref is a reference to x- Note:
constreferences can bind to temporary objects (rvalues).
-
- Pointer Initialization
- Pointers can be initialized to null or point to a valid memory address.
  int* ptr = nullptr;   // C++11 nullptr
  int* ptr2 = &x;       // Pointer to x
Summary Table
| Initialization Type | Syntax Example | Description |
|---|---|---|
| Copy Initialization | int x = 10; |
Assignment-style initialization; may invoke copy constructor. |
| Direct Initialization | int x(10); |
Directly initializes the variable, often more efficient for objects. |
| List Initialization | int x{10}; or std::vector<int> v{1,2}; |
Uses curly braces {}; prevents narrowing conversions. |
| Default Initialization | int x; |
No explicit initialization; may result in garbage values for primitive types. |
| Value Initialization | int x{}; |
Initializes primitive types to zero; calls default constructors for objects. |
| Zero Initialization | static int x; |
Sets primitive types to zero, or calls default constructors. |
| Move Initialization | std::move(obj) |
Transfers ownership of resources from one object to another. |
| Reference Initialization | int& ref = x; |
Initializes a reference to refer to an existing variable. |
| Pointer Initialization | int* ptr = nullptr; |
Initializes a pointer; often initialized with nullptr. |
Various loop
1. for Loop
-
The
forloop is used when you know in advance how many times you want to iterate through the block of code. It consists of three parts: initialization, condition, and increment/decrement. -
Syntax:
  for (initialization; condition; increment) {
      // Code to be executed
  }
Example:
```cpp
for (int i = 0; i < 5; ++i) {
    std::cout << i << " ";  // Output: 0 1 2 3 4
}
```
- Use Case: Best for situations where the number of iterations is known beforehand (e.g., looping over arrays, vectors with known size).
2. while Loop
-
The
whileloop is used when the number of iterations is not known, and you want to loop until a condition becomes false. - Syntax:
while (condition) { // Code to be executed } - Example:
int i = 0; while (i < 5) { std::cout << i << " "; // Output: 0 1 2 3 4 ++i; } - Use Case: Best when you want to loop based on some condition that could change during execution (e.g., waiting for user input, reading from a file).
3. Range-Based for Loop (C++11 and Later)
-
The range-based
forloop simplifies iteration over containers (like arrays, vectors, lists). It automatically handles the iterator behind the scenes. - Syntax:
for (element_type variable : collection) { // Code to be executed } - Example:
std::vector<int> vec = {1, 2, 3, 4, 5}; for (int elem : vec) { std::cout << elem << " "; // Output: 1 2 3 4 5 } - Use Case: Best for iterating over containers (arrays, vectors, lists) in a cleaner, more readable way.
Comparison Table
| Loop Type | Syntax Example | When to Use |
|---|---|---|
for loop |
for (int i = 0; i < N; ++i) |
Known number of iterations, concise control over loop index. |
while loop |
while (condition) |
Unknown number of iterations, condition checked before entering the loop. |
Range-based for |
for (auto elem : collection) |
Clean, efficient way to iterate over containers (arrays, vectors, lists, etc.). |
Pointer —————–
좋은 주제예요! C++에서 **포인터(pointer)**와 **참조(reference)**는 모두 다른 메모리 주소를 통해 값을 조작할 수 있게 해주는 도구지만, 문법과 개념, 쓰임새 면에서 중요한 차이가 있어요.
포인터(pointer) vs 참조(reference)
- 요약
| 항목 | 포인터 (T* ptr) |
참조 (T& ref) |
|---|---|---|
| 선언 시 초기화 | 선택 사항 (null 허용) | 반드시 초기화해야 함 |
| null 가능성 | ✅ nullptr 가능 |
❌ 항상 유효한 객체를 가리켜야 함 |
| 변경 가능성 (다른 대상) | ✅ 다른 주소로 변경 가능 | ❌ 한 번 바인딩되면 대상 고정 |
| 간접 접근 | *ptr, ptr-> |
그냥 ref 사용 |
| 배열/동적 할당과의 궁합 | 매우 좋음 (new[], malloc) |
적합하지 않음 |
| 메모리 주소 표시 | &x, *ptr, ptr++ 등 다양 |
주소를 직접 다루진 않음 |
| 함수 인자로 사용 | 값 자체를 바꾸고 싶을 때 사용 | 동일 목적, 더 직관적이고 안전 |
| 컨테이너 iterator | 대부분 포인터 기반 | 참조는 불가능 |
- ✅ 예제 비교
- 결과는 같지만 문법은 간결하게 다름.
-🔷 포인터 예제
int a = 10; int* ptr = &a; *ptr = 20; // a의 값이 20으로 바뀜- 🔷 참조 예제
  int a = 10;
  int& ref = a;

  ref = 20;  // a의 값이 20으로 바뀜
-
함수 인자 전달 예
-
참조 방식이 더 간결하고 안전하며, 실제 값이 바뀌는 것이 명확하게 보입니다.
-
🔷 포인터 방식
void setZero(int* p) { *p = 0; } int main() { int x = 5; setZero(&x); // 주소 전달 }- 🔷 참조 방식
void setZero(int& r) { r = 0; } int main() { int x = 5; setZero(x); // 변수 그대로 전달 } -
-
주요 특징 요약
| 기능 | 포인터 | 참조 |
|---|---|---|
| 대상 변경 가능 | ✅ (다른 주소 할당 가능) | ❌ (초기 대상 고정) |
| null 상태 | ✅ nullptr 가능 |
❌ null 없음 |
| 역참조 필요 | ✅ *ptr |
❌ ref 자체가 직접 대상 |
| 함수 인자 전달 | 보통 C 스타일 | C++에서 선호 |
| 안전성 | ❌ 실수로 null 접근 위험 | ✅ 안전하고 깔끔 |
| 사용 예 | 배열 처리, 동적 메모리 | 함수 인자, 반환값 등 |
언제 포인터를 써야 할까?
- 동적 할당 (
new,malloc) - 배열 처리 (
T* arr) - 데이터 존재 여부가 optional일 때 (
nullptr허용) - 객체의 소유권, 생명 주기 컨트롤이 필요한 경우
- C API 연동
언제 참조를 써야 할까?
- 인자 값 변경이 필요하지만, 더 안전하고 직관적인 문법을 원할 때
- 대상이 반드시 존재하는 경우
- 함수 반환값을 원본과 연결시키고 싶을 때
- C++ 스타일 코드 작성 시 기본값처럼 사용
🧠 한 줄 요약
참조는 간단하고 안전한 포인터처럼 작동하고, 포인터는 더 유연하지만 위험 부담이 있는 메모리 도구예요.
Pointer and Array
Basic
    int real_val = 5;
    int *p_int_val = &real_val;
    *p_int_val // 5
    p_int_val // address of real_val
    &real_val // address of real_val

    int int_array[] = {1,2,3,4,5};
    int *p_int_array = int_array;

    int_array // address of the first index of int_array array
Array / List / Vector
1. Array
- Type: Fixed-size, contiguous block of memory.
- Syntax:
int arr[5] = {1, 2, 3, 4, 5}; - Key Characteristics:
- Fixed size: The size is determined at compile-time and cannot be changed.
- Memory layout: Stored contiguously in memory, which makes access to elements very fast (O(1) for access).
- No dynamic resizing: You cannot add or remove elements after the array is created.
- No overhead: Arrays are simple and have no extra memory overhead compared to lists or vectors.
- No safety checks: Accessing out-of-bounds elements leads to undefined behavior.
- Use Case: Best for situations where the size of the array is known beforehand and doesn’t change, and fast access to elements is important (e.g., low-level programming, embedded systems).
2. List (std::list)
- Type: Doubly linked list.
- Syntax:
std::list<int> lst = {1, 2, 3, 4, 5}; - Key Characteristics:
- Dynamic size: The size can grow or shrink as elements are inserted or removed.
- Non-contiguous memory: Elements are not stored in contiguous memory, and each element points to the next and previous elements. This makes accessing elements slower (O(n) for access).
- Efficient insertions/removals: Inserting or removing elements (except at the end) is O(1) because only pointers need to be updated.
- Memory overhead: Each element requires extra memory for the pointers to the next and previous elements.
- Use Case: Suitable when frequent insertions and deletions are required in the middle of the collection, but fast random access is not necessary (e.g., implementing queues, managing large datasets where resizing is needed).
3. Vector (std::vector)
- Type: Dynamic array.
- Syntax:
std::vector<int> vec = {1, 2, 3, 4, 5}; - Key Characteristics:
- Dynamic size: The size can grow dynamically as new elements are added.
- Contiguous memory: Elements are stored in contiguous memory blocks, similar to arrays, which makes access very fast (O(1) for access).
- Resizing: When the vector runs out of capacity, it reallocates more memory (typically doubling the capacity), which involves copying elements to a new memory block.
- Efficient access: Accessing elements is fast (O(1)), but insertions and deletions in the middle or beginning can be slow (O(n)) due to shifting of elements.
- Memory overhead: When reallocating memory, some extra capacity is allocated to avoid frequent reallocations, which adds a small memory overhead.
-
Use Case: Best when the size of the collection changes dynamically, and fast access to elements is important (e.g., dynamic arrays, stacks, dynamic lists).
- When should I use Vector at() instead of vector operator[]?
| operator[] | at() |
|---|---|
| fast | slow |
| not bound checking | do boud checking |
Comparison Table
| Feature | Array | List (std::list) |
Vector (std::vector) |
|---|---|---|---|
| Size | Fixed at compile-time | Dynamic | Dynamic |
| Memory Layout | Contiguous | Non-contiguous | Contiguous |
| Element Access | O(1) (Direct) | O(n) (Sequential) | O(1) (Direct) |
| Insert/Remove (Start/Middle) | O(n) | O(1) | O(n) |
| Insert/Remove (End) | O(1) | O(1) | O(1) |
| Resizing | Not possible | Automatic | Automatic (with reallocation) |
| Memory Overhead | None | High (pointers) | Low (extra capacity) |
Summary:
- Array: Use when you know the size of the collection upfront and need fast access to elements.
- List: Use when frequent insertions/deletions are needed, especially in the middle or beginning of the collection.
- Vector: Use when you need a dynamic size but still want fast random access.
If you want to explore code examples or specific performance metrics, let me know!
Various array initialization
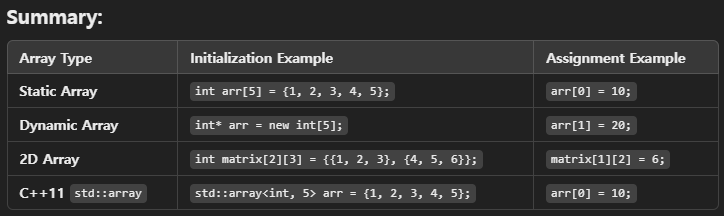
1. Static Array
    // 1. Initialize array with 5 elements
    int arr[5] = {1, 2, 3, 4, 5};
    // 2. The remaining elements are initialized to 0: {1, 2, 0, 0, 0}
    int arr[5] = {1, 2};
    // 3. Uninitialized array, elements contain garbage values
    int arr[5];
    // 4. All elements are initialized to 0
    int arr[5] = {};
    // 5. Uninitialized array
    int arr[5];
    arr[0] = 10;
    arr[1] = 20;
    arr[2] = 30;
    arr[3] = 40;
    arr[4] = 50;
2. Dynamic Array
    // 1. Dynamically allocate an array of 5 integers
    int* arr = new int[5];
    arr[0] = 1;
    arr[1] = 2;
    arr[2] = 3;
    arr[3] = 4;
    arr[4] = 5;

    // 2. Deallocate the dynamic array
    delete[] arr;
3. 2DArray
    int matrix[2][3] = {
                        {1, 2, 3},
                        {4, 5, 6}
                    };  // 2x3 matrix
4. C++11 Style Deduced size Initialization (List Initialization)
int arr[] = {10, 20, 30, 40}; // Size deduced automatically from the initializer list
5. std::array
    #include <array>
    std::array<int, 5> arr = {1, 2, 3, 4, 5};  // std::array initialization

    // assign value like normal arrays
    arr[0] = 10;
    arr[1] = 20;
Lvalue and Rvalue / pass by what
In C++, pass by value and pass by reference are two different methods for passing arguments to functions. To fully understand how these work, it’s important to connect the concepts of lvalue and rvalue.
1. Lvalue vs. Rvalue
-
Lvalue (Left Value): Refers to an object that persists beyond a single expression. It’s essentially a memory address or a variable you can assign to.
Example:
int x = 10; // 'x' is an lvalue -
Rvalue (Right Value): Refers to a temporary value or object that does not persist beyond the current expression. You cannot assign to an rvalue.
Example:
int y = x + 5; // 'x + 5' is an rvalue (a temporary result)
2. Pass by Value
When passing by value, a copy of the argument is passed to the function. This means changes made to the parameter inside the function will not affect the original argument.
-
Behavior: The function gets a copy of the original argument. Any modifications made to the parameter inside the function do not affect the original variable.
-
Example of Pass by Value:
void modify(int a) {
    a = 20; // This change only affects the local copy 'a', not the original argument
}

int main() {
    int x = 10;
    modify(x);  // x is passed by value, so 'x' remains 10
    std::cout << x;  // Output: 10
    return 0;
}
In this case, x is an lvalue, and the function modify receives a copy of x as its parameter. Modifying a inside the function has no effect on x.
- rvalue in Pass by Value: You can also pass an rvalue (temporary value) by value since it’s copied to the function parameter.
modify(5); // This works because the function will copy the value 5 to 'a'
3. Pass by Reference
When passing by reference, the function receives a reference to the original argument, allowing it to modify the original variable.
-
Behavior: The function gets a reference to the original argument, so any changes made to the parameter inside the function will directly affect the original variable.
-
Example of Pass by Reference (with lvalue): ```cpp void modify(int& a) { a = 20; // This modifies the original argument }
int main() { int x = 10; modify(x); // x is passed by reference, so ‘x’ is modified to 20 std::cout « x; // Output: 20 return 0; }
In this case, `x` is an **lvalue** and is passed by reference, allowing the function to modify the original variable `x`.

- **rvalue in Pass by Reference**: You **cannot** pass an rvalue (like `5`) to a function that expects a regular lvalue reference (`int&`), because rvalues are temporary and do not have a persistent memory address.

```cpp
// This will cause an error:
modify(5);  // ERROR: Cannot bind rvalue to lvalue reference
4. Pass by Rvalue Reference (C++11 and Later)
C++11 introduced rvalue references (denoted by &&), which allow you to pass rvalues (temporary values) to functions by reference. This is useful in certain situations like implementing move semantics, which avoids copying large objects unnecessarily.
-
Behavior: The function can “steal” the resources of a temporary object (rvalue) and reuse them, avoiding costly deep copies.
-
Example of Pass by Rvalue Reference:
void modify(int&& a) {
    a = 20;  // Modifies the temporary rvalue
}

int main() {
    modify(5);  // OK: rvalue (temporary value) is passed by rvalue reference
    return 0;
}
In this case, 5 is an rvalue, and the function modify(int&&) can take it as a reference, allowing you to modify the temporary value.
Summary:
| Concept | lvalue | rvalue |
|---|---|---|
| Pass by Value | Copies the lvalue to the function. | Copies the rvalue to the function. |
Pass by Reference (int&) |
Modifies the original lvalue. | Cannot bind rvalue to lvalue reference. |
Pass by Rvalue Reference (int&&) |
Not applicable, only for rvalue. | Allows modifying the rvalue directly. |
When to Use Each:
- Pass by Value: Use when the function doesn’t need to modify the original argument, and copying the argument is inexpensive.
- Pass by Reference: Use when the function needs to modify the original argument or when copying is expensive (e.g., large objects).
- Pass by Rvalue Reference: Use when you want to transfer ownership of a temporary object’s resources (e.g., in move semantics or when avoiding unnecessary copies).
Would you like to see more specific examples, such as how move semantics work with rvalue references?
Lenght of Array and Vector
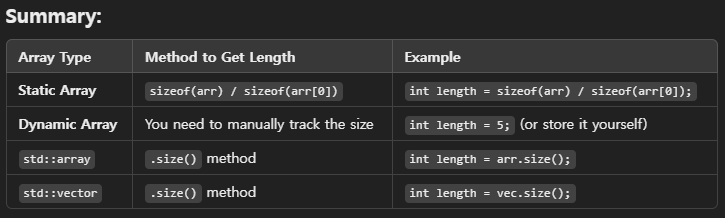
1. Len of Static Array
- total size of the array in bytes and then divide by the size of one element.
    int arr[5] = {1, 2, 3, 4, 5};

    // Get the length of the array
    int length = sizeof(arr) / sizeof(arr[0]);

    std::cout << "Length of the array: " << length << std::endl;
- if you want to get the length of array of char, use std::strlen
    const int max_size = 100;
    char str[max_size] = "stop";

    int length = std::strlen(str);
2. Len of a Dynamic Array (Allocated with new)
- For dynamic arrays allocated using new, the size information is not stored, and the sizeof operator will only give the size of the pointer, not the array. This means you need to manually keep track of the size when you allocate the array.
    int* arr = new int[5];  // Dynamically allocate an array of 5 integers
    int length = 5;  // You need to track the length yourself

    std::cout << "Length of the dynamic array: " << length << std::endl;
    delete[] arr;  // Don't forget to free the memory
3. Length of std::array (C++11 and Later)
- If you are using std::array from C++11, you can use the .size() method to get the number of elements in the array.
    #include <array>
    #include <iostream>

    std::array<int, 5> arr = {1, 2, 3, 4, 5};

    // Get the length of the std::array
    int length = arr.size();

    std::cout << "Length of the std::array: " << length << std::endl;
4. Length of std::vector
    #include <vector>
    #include <iostream>

    std::vector<int> vec = {1, 2, 3, 4, 5};

    // Get the length of the vector
    int length = vec.size();

    std::cout << "Length of the vector: " << length << std::endl;
convert from Vector to Array
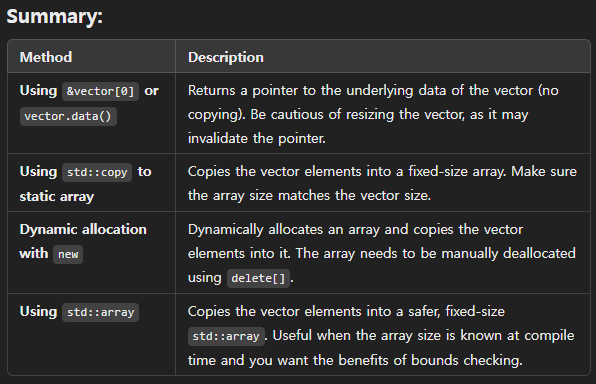
1. Using &vector[0]
- to Get a Pointer to the Underlying Array
    #include <vector>
    #include <iostream>

    int main() {
        std::vector<int> vec = {1, 2, 3, 4, 5};

        // Get a pointer to the first element of the vector (C-style array)
        int* arr = &vec[0];  // or use vec.data()

        // Now you can use 'arr' as a C-style array
        for (int i = 0; i < vec.size(); ++i) {
            std::cout << arr[i] << " ";  // Output: 1 2 3 4 5
        }

        return 0;
    }
2. Using std::vector<T,Allocator>::data()
- This return
a pointerwhich access the data of vector in the form of a pointer toarray
2. Using std::copy
- to Copy Vector Elements into a Static Array
    #include <vector>
    #include <iostream>
    #include <algorithm>  // For std::copy

    int main() {
        std::vector<int> vec = {1, 2, 3, 4, 5};

        // Create a C-style array with the same size as the vector
        int arr[5];  // Make sure the size matches vec.size()

        // Copy elements from vector to array
        std::copy(vec.begin(), vec.end(), arr);

        // Now you can use 'arr' as a C-style array
        for (int i = 0; i < 5; ++i) {
            std::cout << arr[i] << " ";  // Output: 1 2 3 4 5
        }

        return 0;
    }
3. Dynamic Allocation
- for Converting to a Dynamically Allocated Array
    #include <vector>
    #include <iostream>

    int main() {
        std::vector<int> vec = {1, 2, 3, 4, 5};

        // Dynamically allocate an array with the same size as the vector
        int* arr = new int[vec.size()];

        // Copy elements from the vector to the array
        std::copy(vec.begin(), vec.end(), arr);

        // Use the dynamically allocated array
        for (size_t i = 0; i < vec.size(); ++i) {
            std::cout << arr[i] << " ";  // Output: 1 2 3 4 5
        }

        // Don't forget to free the dynamically allocated memory
        delete[] arr;

        return 0;
    }
4. Using std::array (C++11)
    #include <vector>
    #include <array>
    #include <iostream>

    int main() {
        std::vector<int> vec = {1, 2, 3, 4, 5};

        // Create a std::array with the same size as the vector
        std::array<int, 5> arr;

        // Copy elements from vector to std::array
        std::copy(vec.begin(), vec.end(), arr.begin());

        // Now you can use 'arr' as a safer, fixed-size array
        for (int i = 0; i < arr.size(); ++i) {
            std::cout << arr[i] << " ";  // Output: 1 2 3 4 5
        }

        return 0;
    }
Class
Main
#include <iostream>
#include <string>

#include "PhoneBook.h"

using namespace std;

int main()
{
    PhoneBook my_phonebook;

    ...

    return 0;
}
header
#ifndef PHONE_BOOK_H_
#define PHONE_BOOK_H_

const int kMaxStr = 20; // 문자열의 최대 글자 수

struct Contact
{
    char name[kMaxStr];
    char phone[kMaxStr];
};

class PhoneBook
{
public:
    PhoneBook();
    ~PhoneBook();

    bool IsEmpty();
    bool IsFull();
    void PrintAll();
    void PrintContact(int i);
    void AddContact();
    void AddContact(const char name[], const char phone[]);
    int FindByName();
    bool IsEqual(const char str1[], const char str2[]);
    void DeleteByName();

private:
    int capacity_ = 3; // 연락처 최대 개수 (변경 가능)
    int num_contacts_ = 0;
    Contact *contacts_ = nullptr;
};

#endif
cpp file
#include "PhoneBook.h"

#include <cassert>
#include <iostream>
#include <cstring> // memcpy(.)

using namespace std;

PhoneBook::PhoneBook()
{
    contacts_ = new Contact[capacity_];
}

PhoneBook::~PhoneBook()
{
    if (contacts_)
        delete[] contacts_;
}

bool PhoneBook::IsEmpty()
{
    assert(num_contacts_ >= 0);

    if (num_contacts_ == 0)
        return true;
    else
        return false;
}

bool PhoneBook::IsFull()
{
    if (num_contacts_ == capacity_)
        return true;
    else
        return false;
}

void PhoneBook::PrintAll()
{
    for (int i = 0; i < num_contacts_; i++)
    {
        PrintContact(i);
    }
}

void PhoneBook::PrintContact(int index)
{
    cout << index << " ";
    cout << contacts_[index].name;
    cout << ", " << contacts_[index].phone << endl;
}

void PhoneBook::AddContact(const char name[], const char phone[])
{
    assert(!IsFull()); // 디버깅할 때 assert 괄호 안쪽 조건이 false가 되면 오류 처리

    memcpy(contacts_[num_contacts_].name, name, sizeof(contacts_[num_contacts_].name));
    memcpy(contacts_[num_contacts_].phone, phone, sizeof(contacts_[num_contacts_].phone));

    num_contacts_ += 1;
}

void PhoneBook::AddContact()
{
    // capacity_가 고정된 경우
    if (IsFull())
    {
        cout << "더 이상 추가할 수 없습니다." << endl;
        return;
    }

    // 더 해볼 것: 메모리를 재할당 받아서 연락처 개수 제한 없애기

    char new_name[kMaxStr];
    char new_phone[kMaxStr];

    cout << "이름을 입력해주세요 : ";
    cin.getline(new_name, sizeof(new_name));

    cout << "전화번호를 입력해주세요 : ";
    cin.getline(new_phone, sizeof(new_phone));

    AddContact(new_name, new_phone);
}

int PhoneBook::FindByName()
{
    char search_name[kMaxStr];

    cout << "검색할 이름을 입력해주세요 : ";
    cin.getline(search_name, sizeof(search_name));

    // TODO: IsEqual(), PrintContact(i), return i

    cout << search_name << " 님을 찾지 못했습니다." << endl;

    return -1;
}

bool PhoneBook::IsEqual(const char str1[], const char str2[])
{
    for (int i = 0; i < kMaxStr; i++)
    {
        if (str1[i] != str2[i])
            return false;

        if (str1[i] == '\0')
            return true;
    }

    return true;
}

void PhoneBook::DeleteByName()
{
    // 삭제할 때 메모리를 줄이지는 않는 것으로 할께요.

    int index = FindByName();

    if (index >= 0)
    {
        // TODO: 중간에서 삭제했을 경우 데이터 정리

        // TODO: num_contacts_ 하나 감소

        num_contacts_ -= 1;
    }
}
namespace
✅ 기본 문법
- definition :
namespace는 이름(함수, 변수, 클래스 등)의 충돌을 방지하기 위해 사용하는 공간 단위입니다.-
“이름들을 그룹으로 묶어주는 상자” > 서로 다른 개발자가 같은 이름을 써도 충돌하지 않도록 도와주는 범위 스코프 도구
namespace 이름 {
    // 여기에 변수, 함수, 클래스 등을 선언
}
- 🔧 예제
namespace A {
    void sayHello() {
        std::cout << "Hello from A\n";
    }
}

namespace B {
    void sayHello() {
        std::cout << "Hello from B\n";
    }
}

int main() {
    A::sayHello();  // 출력: Hello from A
    B::sayHello();  // 출력: Hello from B
}
- ✅ 주요 목적
| 목적 | 설명 |
|---|---|
| 이름 충돌 방지 | 서로 다른 라이브러리에서 같은 이름의 함수/변수가 있어도 안전 |
| 코드 구조화 | 모듈화 및 논리적인 그룹핑 가능 |
| 라이브러리 설계에 필수 | 표준 라이브러리(STL)는 전부 std namespace 안에 있음 |
사용 방법 요약
-
- 접근 시 범위 연산자 사용
MyNamespace::myFunction();
-
using으로 생략 가능- ❗ 단점: 전역에 이름을 풀어버리므로 충돌 위험 증가
using namespace MyNamespace; myFunction(); // OK -
- 중첩 namespace
namespace A {
    namespace B {
        void func();
    }
}
// 또는 C++17부터
namespace A::B {
    void func();
}
- ✅ 예시: 전역 충돌 방지
// mathLib1
namespace Math {
    double sqrt(double x) { return x / 2; }  // 가짜 sqrt
}

// mathLib2
namespace OtherMath {
    double sqrt(double x) { return x * 0.5; }  // 또 다른 sqrt
}
→ Math::sqrt(x) 와 OtherMath::sqrt(x)는 서로 충돌하지 않음!
익명 namespace (파일 내 전용 영역)
- 내부 구현 감추기에 좋음 (
static변수 대체)
namespace {
    int internalVar = 42;  // 이 파일 안에서만 접근 가능
}
✅ namespace vs class 스코프 차이
| 구분 | namespace | class |
|---|---|---|
| 목적 | 이름 구분 | 객체 설계 |
| 포함 가능 요소 | 변수, 함수, 클래스 등 | 멤버 변수, 멤버 함수 |
| 접근 | MyNS::x |
MyClass::x (또는 객체.member) |
string formatting
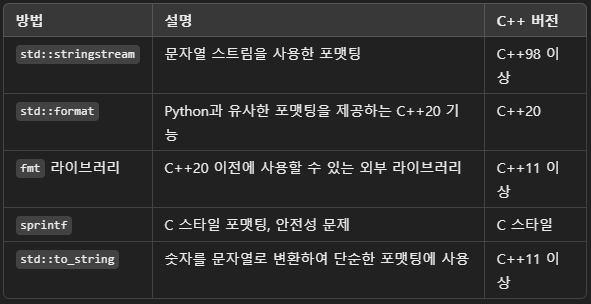
1. std::stringstream
    #include <iostream>
    #include <sstream>  // for std::stringstream
    #include <string>

    int main() {
        int age = 25;
        double height = 180.5;
        std::string name = "John";

        std::stringstream ss;
        ss << "Name: " << name << ", Age: " << age << ", Height: " << height << " cm";

        std::string formattedString = ss.str();  // 스트림 내용을 문자열로 변환
        std::cout << formattedString << std::endl;
        return 0;
    }
2. std::format (C++ 20)
    #include <iostream>
    #include <format>  // C++20 std::format
    #include <string>

    int main() {
        int age = 25;
        double height = 180.5;
        std::string name = "John";

        // std::format을 사용한 문자열 포맷팅
        std::string formattedString = std::format("Name: {}, Age: {}, Height: {} cm", name, age, height);

        std::cout << formattedString << std::endl;

        return 0;
    }
3. sprintf
    #include <iostream>
    #include <cstdio>  // for sprintf
    #include <string>

    int main() {
        int age = 25;
        double height = 180.5;
        const char* name = "John";

        char buffer[100];  // 결과를 저장할 버퍼

        // sprintf를 사용한 포맷팅
        std::sprintf(buffer, "Name: %s, Age: %d, Height: %.1f cm", name, age, height);

        std::cout << buffer << std::endl;

        return 0;
    }
4. std::to_string
    #include <iostream>
    #include <string>

    int main() {
        int age = 25;
        double height = 180.5;
        std::string name = "John";

        // std::to_string을 사용한 포맷팅
        std::string formattedString = "Name: " + name + ", Age: " + std::to_string(age) + ", Height: " + std::to_string(height) + " cm";

        std::cout << formattedString << std::endl;

        return 0;
    }
std library
std::strlen
- return the length of char array (not std::string)
    const char str1[maxStr] = "stop1";
    char str2[maxStr] = "stop12";

    int len = sizeof(str1) / sizeof(str1[0]); // This is not suitable. because this is for the length of array

    const std::string str3 = "teststring";
    std::cout << std::strlen(str2) << std::endl;
    std::cout << str3.length() << "  /  " << str3.size() << std::endl;
std::min
- find the smallest number among three number
// Using std::min to find the smallest number
    int smallest = std::min(num1, std::min(num2, num3));
std::vector
- data()
#include <iostream> #include <vector> int main() { std::vector<float> myVec = {1.1f, 2.2f, 3.3f}; float* ptr = myVec.data(); // 포인터로 접근 for (size_t i = 0; i < myVec.size(); ++i) { std::cout << "myVec[" << i << "] = " << ptr[i] << std::endl; } return 0; } - 📌 data()와 &vec[0]의 차이점은?
| 구분 | 설명 |
|---|---|
| vec.data() | 벡터의 내부 데이터를 가리키는 포인터를 안전하게 반환 (비어 있어도 안전함, 특히 C++17 이상에서) |
| &vec[0] | 첫 번째 요소의 주소. 벡터가 비어 있을 경우 사용하면 undefined behavior(UB) 발생 가능 |
- ✅ 따라서 vec.data()를 사용하는 것이 더 안전합니다.
좋아요! C/C++에서 memcpy()는 메모리를 다룰 때 아주 자주 쓰이는 함수 중 하나입니다. 그리고 이와 관련된 여러 메모리 함수들도 함께 정리해 드릴게요.
std::string_vew
- C++17부터 도입된 가볍고 빠른 문자열 handler
- 문자열의 일부분을 참조하거나, 복사 없이 문자열을 전달할 때 사용
- 내부적으로는 문자열 포인터 + 길이 정보만 가지고 있음
- null 종료 문자 필요 없음 → C-style 문자열과도 호환 가능
- 읽기 전용 → 수정 불가
#include <iostream>
#include <string_view>

void greet(std::string_view name) {
    std::cout << "Hello, " << name << "!\n";
}

int main() {
    greet("Alice"); // 문자열 리터럴
    std::string user = "Bob";
    greet(user);    // std::string도 전달 가능
}
std::find_if
- C++ 표준 라이브러리
<algorithm>헤더에 정의된 함수로, 컨테이너 내에서 특정 조건을 만족하는 첫 번째 요소를 찾는 데 사용돼요.
template <class InputIterator, class UnaryPredicate>
InputIterator find_if(InputIterator first, InputIterator last, UnaryPredicate pred);
first: 검색 시작 지점 (iterator)last: 검색 종료 지점 (iterator, 포함되지 않음)pred: 조건을 정의하는 함수 또는 람다 (true/false 반환)- 👉 조건을 만족하는 첫 번째 요소의 iterator를 반환하고, 없으면
last를 반환해요. - 람다와 함께 쓰는 예시
auto found = std::find_if(arr.begin(), arr.end(), [](std::string_view str) { return str.find("nut") != std::string_view::npos; }); containsNut함수를 따로 정의하지 않고, 람다 표현식으로 바로 조건을 작성- 코드가 더 간결하고, 사용 위치에 가까이 정의되어 있어서 가독성이 좋아요
-
💡 언제 쓰면 좋을까?
- 배열이나 벡터에서 조건에 맞는 첫 번째 요소를 찾고 싶을 때
std::find는 정확한 값을 찾을 때 사용하고,std::find_if는 조건 기반 검색에 사용해요
물론이죠! C++의 <algorithm> 헤더에는 컨테이너를 순회하며 조건을 검사하는 아주 유용한 함수들이 있어요. std::find_if_not, std::all_of, std::any_of는 그 중에서도 조건 기반 탐색과 검증에 특화된 함수들이에요. 아래에 각각을 쉽게 설명해드릴게요.
std::find_if_not
- 역조건을 만족하는 첫 번째 요소를 찾는 함수
std::find_if가 조건을 만족하는 요소를 찾는 반면,find_if_not은 조건을 만족하지 않는 첫 번째 요소를 찾아요.
#include <algorithm>
#include <vector>
#include <iostream>

bool isOdd(int x) { return x % 2 != 0; }

int main() {
    std::vector<int> v = {1, 3, 5, 8, 9};
    auto it = std::find_if_not(v.begin(), v.end(), isOdd);
    if (it != v.end())
        std::cout << "첫 번째 짝수: " << *it << '\n'; // 출력: 8
}
std::all_of
- 모든 요소가 조건을 만족하는지 검사
- 하나라도 조건을 만족하지 않으면
false를 반환
std::vector<int> v = {2, 4, 6, 8};
bool result = std::all_of(v.begin(), v.end(), [](int x) { return x % 2 == 0; });
// result == true
- 💡
std::all_of는 내부적으로std::find_if_not을 사용해서 구현되기도 해요
std::any_of
- 하나라도 조건을 만족하는 요소가 있는지 검사
- 조건을 만족하는 요소가 하나라도 있으면
true
std::vector<int> v = {1, 3, 5, 6};
bool result = std::any_of(v.begin(), v.end(), [](int x) { return x % 2 == 0; });
// result == true (6이 짝수니까)
enum / enum class
- 전통적인
enum의 특징 (C 스타일 열거형)
enum Color {
    RED,
    GREEN,
    BLUE
};
- 문제점: 값이 전역 범위(global scope)에 노출됨
RED,GREEN,BLUE는 전역 네임스페이스로 바로 들어감- 즉, 이름 충돌이 쉽게 발생하고,
enum끼리 구분 없이 혼용될 수 있는 위험이 있음
int RED = 123;

enum Color {
    RED,  // ⚠ 에러 또는 이름 충돌
    GREEN,
    BLUE
};
- 위험 예시:
UP이라는 이름이 Direction과 Status 모두에 대해 유효한 것처럼 보임
enum Direction { UP, DOWN };
enum Status { OK, FAIL };

Direction d = UP;    // OK
Status s = UP;       // ⚠ 틀려도 컴파일 가능. 혼동 발생
enum class의 특징 (C++11 이후, strongly scoped enum)
enum class Color {
    RED,
    GREEN,
    BLUE
};
-
장점: 값이 전역 범위에 노출되지 않음
Color::RED,Color::GREEN등 스코프를 통해 접근- 다른 enum과 이름 충돌 없음
-
타입이 명확하고, 실수 방지
- 예시:
enum class Direction { UP, DOWN };
enum class Status { OK, FAIL };

Direction d = Direction::UP;
// Status s = Direction::UP;  // ❌ 컴파일 에러! 타입 다름
- 이게 바로 핵심:
enum은 전역에 값을 “풀어버리지만”,enum class는 값을 “묶어두고” 안전하게 관리합니다.
-
언제
enum이 위험해지나? - 프로젝트가 커지고, 열거형이 많아질수록
- 다른 라이브러리에서 동일한
enum값이 있을 때 -
디버깅 시 어떤
enum에서 나온 값인지 혼동될 때 - 정리 요약 (전역 범위 노출을 중심으로)
| 항목 | enum (전통적) |
enum class (현대적) |
|---|---|---|
| 값의 위치 | 전역 범위로 노출됨 (RED) |
enum 스코프 내로 제한 (Color::RED) |
| 이름 충돌 위험 | 높음 | 없음 |
| 명확한 타입 체크 | 약함 | 강함 (타입 안전) |
| 동일 이름 사용 | 불가능 | 가능 (스코프가 다름) |
| 의도하지 않은 비교 | 허용 | 금지됨 (다른 enum끼리 비교 불가) |
- 한 줄 요약
enum class를 쓰면 전역 범위를 더럽히지 않고, 각 값들이 소속된 타입 안에만 존재해서 안전하고 명확하게 코딩할 수 있어요.
좋아요!
이번에는 enum class를 switch문과 함께 쓰는 방법과, 그 과정에서 자주 사용되는 static_cast까지 함께 깔끔하게 설명해드릴게요.
1. enum class와 switch문 사용 방법
-
기본
enum과 달리,enum class는 범위 스코프가 명확하므로switch문에서 값을 비교하려면 반드시EnumType::Value형식으로 접근해야 합니다. -
🔧 예시 코드:
#include <iostream>

enum class Status {
    OK,
    WARNING,
    ERROR
};

void printStatus(Status s) {
    switch (s) {
        case Status::OK:
            std::cout << "Everything is fine.\n";
            break;
        case Status::WARNING:
            std::cout << "There is a warning.\n";
            break;
        case Status::ERROR:
            std::cout << "An error occurred.\n";
            break;
    }
}
- 주의할 점:
switch(s)처럼enum class값을 받을 수 있다.case OK:처럼 쓰면 컴파일 에러 발생 →Status::OK처럼 정확한 범위 지정 필요
2. static_cast를 사용하는 이유
-
C++의
enum class는 기본적으로 암묵적인 정수형 변환이 안 됩니다. 그래서 숫자 연산이나 출력 등에서 정수형으로 명시적 변환을 해야 할 때static_cast를 사용합니다. -
🔧 예시:
enum class→int
#include <iostream>

enum class Direction {
    LEFT = 0,
    RIGHT = 1,
    UP = 2,
    DOWN = 3
};

int main() {
    Direction dir = Direction::RIGHT;

    int value = static_cast<int>(dir);  // 명시적 변환
    std::cout << "Enum as int: " << value << std::endl;

    return 0;
}
- 출력:
Enum as int: 1
- 🔧 예시:
int→enum class
int user_input = 2;
Direction dir = static_cast<Direction>(user_input);

if (dir == Direction::UP) {
    std::cout << "Going up!\n";
}
✅ 이처럼 enum class는 강한 타입 검사 덕분에
타입을 정수 ↔ 열거형으로 변환할 땐 반드시 static_cast를 써야 합니다.
예제: 합친 예시 (switch + static_cast)
#include <iostream>

enum class Menu {
    PLAY = 1,
    OPTIONS = 2,
    QUIT = 3
};

int main() {
    int choice;
    std::cout << "Enter your choice (1-3): ";
    std::cin >> choice;

    Menu selected = static_cast<Menu>(choice);

    switch (selected) {
        case Menu::PLAY:
            std::cout << "Starting game...\n";
            break;
        case Menu::OPTIONS:
            std::cout << "Opening options...\n";
            break;
        case Menu::QUIT:
            std::cout << "Quitting.\n";
            break;
        default:
            std::cout << "Invalid choice!\n";
    }

    return 0;
}
- ✅ 요약
| 항목 | 내용 |
|---|---|
enum class in switch |
case EnumType::Value 형식으로 써야 함 |
static_cast<Enum>(int) |
정수를 enum class로 바꿀 때 |
static_cast<int>(Enum) |
enum class를 정수로 바꿀 때 |
| 암묵적 변환 허용 여부 | ❌ enum class는 허용 안 함 (명시적 변환 필요) |
- 관련주제 :
enum class내부 타입 지정 (enum class Status : uint8_t)std::underlying_type활용법enum class를 문자열로 출력하는 방법
좋아요!
이번에는 C++에서 자주 마주치는 extern과 inline 키워드에 대해 정리된 표와 예시 중심으로 깔끔하게 설명해드릴게요.
extern vs inline
extern 키워드
- 의미:
변수또는함수가 **다른 파일에 정의되어 있으며, 여기선 “선언만 한다”**는 의미입니다.
- 용도:
- 전역 변수나 함수를 여러 소스 파일에서 공유할 때 사용
- 다중 정의 방지
-
사용 예시:
- file1.cpp
int globalVar = 42; // 실제 정의- file2.cpp**
extern int globalVar; // 선언만 void printVar() { std::cout << globalVar << std::endl; // 사용 가능 } -
extern은 “다른 곳에 이거 있어!” 라고 선언만 해주는 역할입니다.
inline 키워드
- 📌 의미:
- 컴파일러에게 이 함수를 호출하는 대신 함수 코드를 그대로 복사해서 삽입하라고 “제안”하는 키워드입니다.
- 📦 용도:
- 짧은 함수에 오버헤드를 줄이기 위해 사용
- 헤더 파일에 함수 정의를 포함시킬 때 컴파일러가 다중 정의를 피하도록 함
-
사용 예시:
- 이 함수가
square(5)로 호출되면 컴파일 타임에 계산함함
- 이 함수가
inline int square(int x) {
    return x * x;
}
inline 함수와 헤더 파일
// myMath.h
#ifndef MYMATH_H
#define MYMATH_H

inline int add(int a, int b) {
    return a + b;
}

#endif
inline을 붙이면 여러 번 include 되어도 링크 에러 없이 정의가 허용됩니다.
요약약
| 항목 | extern |
inline |
|---|---|---|
| 역할 | 다른 파일에 있는 것 선언만 함 | 호출 대신 코드 삽입 요청 |
| 적용 대상 | 변수, 함수 | 함수 |
| 사용 위치 | .cpp에서 다른 .cpp 변수/함수 접근 |
짧은 함수 정의를 .h 파일에 쓸 때 |
| 다중 정의 시 | ✅ 선언만 하므로 OK | ✅ 링크 시 중복 정의 방지 |
| 속도 영향 | ❌ 없음 | ✅ 호출 오버헤드 줄일 수 있음 (조건부) |
extern👉 “이건 다른 파일에 있어!”inline👉 “이 함수 짧으니까 호출 말고 그냥 코드 복붙해!”
주의할 점
extern은 정의가 반드시 어딘가에 있어야 함. (안 그러면 undefined reference 에러)inline은 컴파일러가 무조건 인라인해주는 건 아님 (함수가 너무 크면 무시됨)- C++에서
inline함수는 **ODR(One Definition Rule)**을 위반하지 않도록 해줌 → 헤더에 여러 번 포함돼도 문제 없음
메모리 관련 함수들
memcpy
#include <cstring>  // or <string.h>

void* memcpy(void* dest, const void* src, std::size_t count);
- 역할
- 메모리 블록을
src에서dest로count바이트 복사합니다. - 메모리 내용 자체를 그대로 바이트 단위로 복사합니다.
- 메모리 블록을
- 사용 예
#include <iostream>
#include <cstring>

int main() {
    char src[] = "Hello, world!";
    char dest[20];

    std::memcpy(dest, src, strlen(src) + 1);  // +1 to copy null terminator

    std::cout << "Copied: " << dest << std::endl;
    return 0;
}
- 출력:
Copied: Hello, world!
- 주의
src와dest가 겹치면(메모리 중첩) 동작이 정의되지 않습니다 (undefined behavior).- 그런 경우엔
memmove()를 사용해야 합니다 (아래 참고 👇).
자주 쓰이는 메모리 관련 함수들 정리
| 함수명 | 설명 |
|---|---|
memcpy(dest, src, size) |
메모리 복사 (중첩❌) |
memmove(dest, src, size) |
메모리 복사 (중첩 허용✅) |
memset(ptr, value, size) |
메모리 초기화 (value로 size만큼 채움) |
memcmp(ptr1, ptr2, size) |
메모리 비교 (같으면 0) |
strlen(str) |
문자열 길이 계산 (\0까지) |
strcpy(dest, src) |
문자열 복사 (\0 포함) |
strncpy(dest, src, n) |
문자열 복사 (n바이트까지만) |
1. memmove()
void* memmove(void* dest, const void* src, std::size_t count);
memcpy()와 비슷하지만, 중첩된 메모리 영역도 안전하게 복사 가능
char str[] = "abcdef";
std::memmove(str + 2, str, 4);  // 안전하게 이동 가능
2. memset()
void* memset(void* ptr, int value, std::size_t num);
- 메모리를 특정 값으로 초기화
char buffer[100];
std::memset(buffer, 0, sizeof(buffer));  // 모두 0으로 초기화
3. memcmp()
int memcmp(const void* ptr1, const void* ptr2, std::size_t num);
- 두 메모리 블록의 내용을 비교
- 결과:
0→ 동일<0→ptr1<ptr2>0→ptr1>ptr2
char a[] = "abc";
char b[] = "abc";
std::cout << memcmp(a, b, 3);  // 출력: 0
memcpy()vsstd::copy()
| 항목 | memcpy() |
std::copy() |
|---|---|---|
| 헤더 | <cstring> |
<algorithm> |
| 타입 안정성 | 없음 (void*) | 있음 (템플릿) |
| null 포함 | 복사함 | 무관 |
| 사용 용도 | Raw memory (byte-level) | 타입 있는 컨테이너 (e.g., vector) |
- 실전에서 언제 쓰나?
| 상황 | 추천 함수 |
|---|---|
| 배열 복사 (char[], int[]) | memcpy or std::copy |
| 중첩 복사 가능성 있을 때 | memmove |
| 배열 초기화 | memset |
| 포인터 비교 | memcmp |
| 문자열 조작 | strcpy, strncpy, strlen 등 |
- 요약
| 함수 | 주요 목적 | 중첩 허용 | 안전성 |
|---|---|---|---|
memcpy() |
빠르고 간단한 메모리 복사 | ❌ | 빠름, 위험할 수 있음 |
memmove() |
중첩 가능 복사 | ✅ | 안전 |
memset() |
메모리 초기화 | ✅ | 안전 |
memcmp() |
메모리 내용 비교 | ✅ | 안전 |
- C++에서는
std::vector,std::string,std::array,std::copy같은 고수준 컨테이너/알고리즘이 제공되지만,
성능 또는 시스템 프로그래밍 영역에서는memcpy계열이 여전히 매우 유용합니다.
Additional Contents
static_cast
“\0” and ‘\0’ are not same
- ‘\0’ is the end of the array of char
assert()
- 사용 목적
- 디버깅을 도와주는 함수
- 특징
- argument로 넣은 조건식이 false이면 무조건 즉시 종료
- 종료된곳의 조건 과 파일 그리고 줄번호를 출력해줌
#include <cassert>

assert(조건식);