Blender
Questions to AI
- Markdown question
- How to mark some sentences like below for all written ideas here
- How to add Star Icon to emphasize points
- How to mark some sentences like below for all written ideas here
- How to use a customized variable for build a file path ?
- What kinds of knowledge is for template-management ?
- Deifference between data-block and object ?
- How to design lookdev-assignment system
- what is a form for a group of materials for one asset
- How to store assignment information
- How to assign materials to motion cache (shot data) by utilizing the assignment information
- Is it right to think like
data blockis bigger concept, compared toobject. And it’s something conceptualAssetis something conceptual, which isa group of data blocksand the group must havemeaningone blend filecontainsmultiple scenes, and each scene is the same as each shot or each Asset
-
In the case of Blender, a file is supposed to have all data and the data need to be updated by script like Maya ? or a file is suppoed to be built with the latest version of Assets - bundle of caches and Surfacing/Lighting template - like Katana and the file only holds some edits from users ? This question is for a feature which allows users to prepare their scene.
-
What is a form for groom-deformation feature which is designed to deform groom in every frame based on animated mesh coordinates. In katana, the form of the same feature is Ops, and it is wrapped into Supertool.
-
Can you come up with any ideas regarding how to utilize knowlege of Scene ?
- Please give me some codes to accomplish the dev-item or ideas which are answered by AI
Sub Agents
| Agent Name | Description |
|---|---|
| Dev-Item Designer | Considering on |
| Test Case designer | Make test cases and design test order based on dev-itmes |
| Developer | Considering Dev-item and test cases, the agent will implement new features and test the features until all error disappear |
| Document writer | Write any kinds of documents as to new features which completed to be tested |
MCP
- Context 7
- …
Bardel pipeline
Which Departments on Blender
- Surfacing
- Lighting
- Rendering
Dev-Items
General
- Save any preview image when Asset creation is triggered
- Following Blender’s Path Layout
Surfacing
-
I would not use a word Asset to differentiate between
AssetandSurfacing - Surfacing file builder
- Load an asset (Types of asset are Character, Prop, Set and Vehicle )
- Load the latest version of Surfacing-template or the selected version of the template
- Surfacing Template Management
- Basic Surfacing-template for all shows
- Provide any kinds of interface or tools allowing users to design Surfacing-template
- Need to be versioned
- Export assignment information
- this is the same thing as exporting klf file
- Asset Library
- only for a list of below
- lighting for light setup like turntable
- material
- shader
- shader
- Three kinds of libraries
- Default library
- Show library
- USer library
- only for a list of below
Lighting
- Shot file builder
- Load a list of data below
- motion cache bundle
- cfx cache bundle
- fx cache bundle
- Set
- (Groom for groom-deformation based on motion-cache)
- Lookdev Assignment
- Assign some exported lookdev to caches above including not only motion cache but also groom/cfx/fx/set
- Regarding a Set, the exported lookdev is supposed to be assigned to eache prototype for PointInstancers
- Load the latest version of seq/shot tempalte
- Put objects (caches) into Collection
- Load a list of data below
- Sequence Template Management
- Need to be versioned
- Shot Template Management
- Need to be versioned
- Auto-Collection
- When caches(objects) are loaded, the objects are set to sepecific collecton based on APS schema
- Asset Library
- only for light-setup
- Three kinds of libraries
- Default library
- Show library
- USer library
Rendering
- Batch Render
- Denosier
- Stiching render outputs
- Any other optimization for rendering
Official Docs
- Primary purpose is to write down contents which are essential for pipeline dept
Data-Blocks
- Url link
- Definition
- basic unit of data in blender
- protected
- A status which prevents data-block from being deleted
- To protect a data-block, use the button with the shield icon next to its name.
- Use Case
- Implementing Asset library
- Ideas :
- Regarding Asset library or something similar to the thing, pipeline dept can set data-block to
protected status
- Regarding Asset library or something similar to the thing, pipeline dept can set data-block to
- Name
- Unique by using namespace
- Check name-collision, so take some cost on computation
- Ideas
- Make sure all names of data-block are unique to avoid
unnecessary computation
- Make sure all names of data-block are unique to avoid
Asset
- Url links
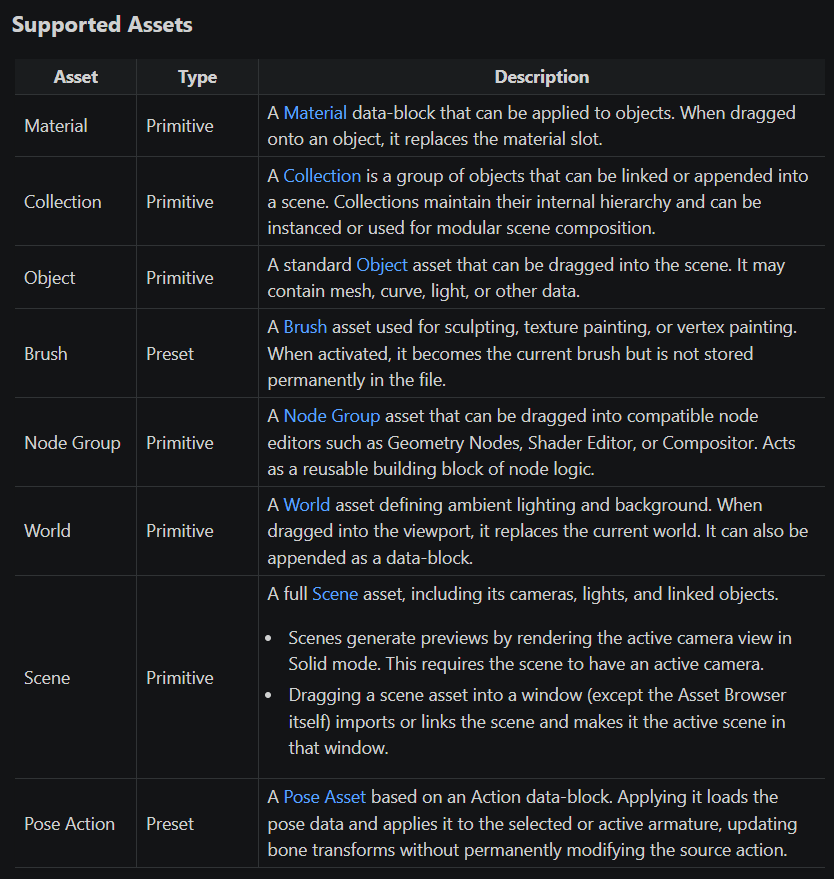
- Asset Types
- Primitive
- Focus on thie type
- Preset
- only for Pose Action and Brush
- Primitive
Scene
- Url link
- Definition
- a way to organize user’s work
- an unit which is equal to a group of data blocks
- Ideas
- The feature could be sued for Asset/Seq/Shot templates
Collection
- Url link
- Definition
- Kinds of group of objects
- Points
- All objects are put into
Scene Collectionwhich is main collectionby default
- All objects are put into
Packed Data
- Url link
File Paths
- Url link
- Description
- kinds of syntax for file path
- Ideas
- Utilize this features to build file paths for building a blend-file or for building rendering-output-paths
Asset Browser
- Url link
- Definition
- one of windows or interfaces
- Ideas
- Utilizie the window as a loader tool
- Pipeline dept need to decide conventions and organize sections
Blend files Previews
- Two types of Previews
- Blend-File-Preview
- Data-Blocks-Preview
Use cases of python
bpy Namespace 개요
Blender API를 다룰 때 세 네임스페이스의 역할을 명확히 구분하는 것이 중요합니다.
| 네임스페이스 | 역할 | 파이프라인 용도 |
|---|---|---|
bpy.types |
모든 데이터 타입·UI 요소·Operator의 클래스 정의 (RNA 메타데이터) | 커스텀 프로퍼티 확장, UI 패널·Operator 등록 |
bpy.data |
현재 .blend 파일에 로드된 실제 데이터 인스턴스 (DNA) |
bpy.data.scenes, bpy.data.objects 등 실제 자원 접근 |
bpy.context |
아티스트가 현재 활성화한 윈도우·오브젝트·씬 등 런타임 상태 (읽기 전용 포인터) | 현재 작업 컨텍스트 참조 |
Shot 메타데이터 주입
bpy.types.Scene은 렌더링 설정, 애니메이션 타임라인, 오브젝트 계층 구조를 총괄하는 최상위 데이터 컨테이너입니다. 타 DCC로 비유하면 Maya의 main 디렉토리, Houdini의 /obj 네트워크 전체와 유사합니다. bpy.props로 등록된 커스텀 프로퍼티는 .blend 파일 저장 시 DNA 레이어에 완전히 보존되므로 렌더 팜이나 타 파이프라인 툴이 가동될 때 데이터 유실이 없습니다.
아래 코드는 bpy.types.Scene을 확장해 스튜디오 USD 파이프라인 메타데이터를 주입하고, Properties > Scene 탭에 UI 패널을 등록하는 구조입니다.
import bpy
from bpy.types import PropertyGroup, Panel
from bpy.props import StringProperty, PointerProperty


class StudioShotMetadata(PropertyGroup):
    """스튜디오 파이프라인 숏 메타데이터 컨테이너."""
    project_name: StringProperty(
        name="Project Name",
        description="현재 진행 중인 프로젝트 코드명",
        default="Default_Project"
    )
    shot_id: StringProperty(
        name="Shot ID",
        description="시퀀스 및 숏 ID (예: SQ010_SH020)",
        default="SQ000_SH000"
    )
    usd_output_path: StringProperty(
        name="USD Export Path",
        description="USD 스트림이 캐싱될 서버 경로",
        default="//usd/shots/",
        subtype='DIR_PATH'
    )


class PANEL_PT_studio_pipeline(Panel):
    bl_label = "Studio Pipeline Context"
    bl_idname = "PANEL_PT_studio_pipeline"
    bl_space_type = 'PROPERTIES'
    bl_region_type = 'WINDOW'
    bl_context = "scene"

    def draw(self, context):
        layout = self.layout
        meta = context.scene.studio_pipeline
        box = layout.box()
        box.label(text="Shot Context Management", icon='MARKER')
        col = box.column(align=True)
        col.prop(meta, "project_name")
        col.prop(meta, "shot_id")
        box.row().prop(meta, "usd_output_path")


classes = (StudioShotMetadata, PANEL_PT_studio_pipeline)


def register():
    for cls in classes:
        try:
            bpy.utils.register_class(cls)
        except ValueError as e:
            print(f"[Studio Pipeline Error] Failed to register {cls.__name__}: {e}")
    # 이 시점 이후 모든 Scene 인스턴스가 'studio_pipeline' 속성을 가짐
    bpy.types.Scene.studio_pipeline = PointerProperty(type=StudioShotMetadata)


def unregister():
    if hasattr(bpy.types.Scene, "studio_pipeline"):
        del bpy.types.Scene.studio_pipeline
    for cls in reversed(classes):
        try:
            bpy.utils.unregister_class(cls)
        except RuntimeError as e:
            print(f"[Studio Pipeline Error] Failed to unregister {cls.__name__}: {e}")


if __name__ == "__main__":
    register()
아키텍처 접근법 비교
bpy.types.Scene을 활용한 자동화/데이터 관리를 설계할 때 파이프라인 성격에 따라 아래 접근법을 비교 선택합니다.
| 접근 방식 | 장점 | 단점 | 추천 Use Case |
|---|---|---|---|
| Python (bpy) API 확장 | 신속한 개발·배포; 상위 Asset DB와 직결 용이; UI/UX 제어 자유 | Python GIL 영향; 수백만 프레임 대규모 데이터 처리 시 오버헤드 | 파이프라인 관리 툴, 메타데이터 트래킹, I/O Operator UI |
| Geometry Nodes | C++ 기반 고속; 뷰포트 실시간 가시화 | Scene 전역 설정 제어 불가; 외부 파일 I/O 연동 제한 | 씬 내 에셋 인스턴싱 레이아웃 자동화, 절차적 프롭 배치 |
| Library Overrides | Blender Foundation 권장 표준; 비파괴적 수정 | 파이프라인 자동화 로직 직접 삽입 불가; 에지 케이스 API 제어 까다로움 | 마스터 에셋을 숏 씬으로 가져와 애니메이션하는 에셋 라이프사이클 관리 |
Custom Operator 구현
bpy.types.Operator는 “실행 가능한 비즈니스 로직의 최소 단위”이자 MVC 패턴의 Controller 역할을 합니다. register()가 호출되는 순간 Blender 내부 Window Manager(wmOperatorType)에 등록되어, 아티스트가 UI 버튼이나 단축키를 실행할 때 C++ 래퍼가 Python 로직을 호출합니다.
bl_idname: Blender 전역 레지스트리에 등록되는 고유 식별자. 타 애드온에서bpy.ops.fm.append_from_selected()형태로 호출하는 앵커가 됩니다.bl_label: 아티스트 UI 및 Search 메뉴(F3)에 노출되는 표시 이름.
execute(self, context) — 진입점과 반환값
execute는 Window Manager가 실제 비즈니스 로직을 트리거하는 메인 진입점입니다.
context매개변수: 오퍼레이터는 항상 실행 당시의 런타임 컨텍스트를 주입받습니다.context.scene으로 현재 씬의 상태에 안전하게 접근합니다.- Early Return 패턴: 파일 존재 여부나 인덱스 유효성을 먼저 검사하고, 예외 시
self.report({'ERROR'}, ...)로 Blender Info 윈도우에 에러를 스트리밍한 뒤 즉시 반환합니다. - 반환값:
{'FINISHED'}: 성공적으로 완료 — Undo 스택에 기록됩니다.{'CANCELLED'}: 조건 불만족 또는 에러 — Undo 스택에 쌓이지 않아 메모리와 상태 무결성을 보존합니다.
bpy.data.libraries.load 컨텍스트 매니저를 Operator 내에서 사용할 때의 주의점: with 블록 안에서는 data_to에 타겟 리스트를 구성하기만 하고, 실제 데이터 참조 및 Modifier 할당 등 후속 작업은 반드시 블록 밖에서 진행해야 안전합니다. 관련 with 패턴은 Python 포스트의 Context Manager 섹션을 참고하세요.
Add Menu 등록
아티스트가 Shift+A 또는 F3으로 스튜디오 에셋을 생성하게 만들려면, 기존 Blender 메뉴(bpy.types.VIEW3D_MT_mesh_add)에 draw 함수를 통해 커스텀 Operator를 연결합니다.
import bpy

def menu_func_custom_asset(self, context):
    self.layout.operator(
        "fm.append_from_selected",
        text="Studio Hero Asset",
        icon='SPHERE'
    )

def register():
    bpy.types.VIEW3D_MT_mesh_add.append(menu_func_custom_asset)

def unregister():
    bpy.types.VIEW3D_MT_mesh_add.remove(menu_func_custom_asset)
Viewport Add Menu & Search (단축키 레퍼런스)
| 기능 | 공식 명칭 | 단축키 | 동작 |
|---|---|---|---|
| 오브젝트 추가 | Add Menu | Shift + A |
팝업 후 즉시 타이핑으로 필터링, Enter로 생성 |
| 전역 기능 검색 | Menu Search | F3 (일부 키맵: Spacebar) |
모든 Operator·에드온 기능을 텍스트로 검색·실행 |
Use Cases of Geometry Nodes
Node Group vs Modifier: 핵심 개념 구분
지오메트리 노드를 에셋화하기 전에 두 개념의 차이를 명확히 이해해야 합니다. 노드 그룹(Node Group)은 로직이 기록된 원본 데이터이고, 모디파이어(Modifier)는 그 데이터를 오브젝트에 적용하는 실행기입니다.
| 구분 | 지오메트리 노드 그룹 (Node Group) | 모디파이어 (Modifier) |
|---|---|---|
| 본질 | 수학, 로직, 메쉬 조작이 기록된 원본 데이터 | 노드 그룹을 오브젝트에 적용하는 실행기 |
| 에셋 저장 | 가능 — Asset Browser에 저장/공유되는 실체 | 불가 — 오브젝트 속성창에만 귀속 |
| 적용 범위 | 파일 내 여러 오브젝트가 동시에 참조(공유) 가능 | 해당 오브젝트에만 귀속 |
| 역할 | “이펙트를 어떻게 만들 것인가”를 정의 | “이펙트를 어떤 오브젝트에 씌울 것인가”를 결정 |
에셋 브라우저에서 노드 그룹 에셋을 오브젝트 위에 드래그하면, Blender는 해당 오브젝트의 모디파이어 탭에 Geometry Nodes 모디파이어를 자동 생성하고 그 안에 노드 그룹을 끼워 넣습니다. 저장하고 재사용하는 실체는 항상 노드 그룹입니다.
Geometry Node Asset 정리 및 에셋화
지오메트리 노드 그룹을 에셋 라이브러리에 등록할 때는 씬 파일에서 불필요한 데이터를 완전히 제거하는 과정이 필수입니다. Blender는 데이터 블록(Data-block) 시스템을 사용하기 때문에 뷰포트에서 오브젝트를 삭제해도 연결된 메쉬, 머티리얼, 텍스처가 고아 데이터(Orphan Data)로 파일에 남습니다.
1단계: 핵심 에셋 보호 (Fake User)
청소 전에 노드 그룹이 삭제되지 않도록 보호합니다.
- Node Editor에서 노드 그룹 이름에 우클릭 →
Mark as Asset선택 - 이름 옆 방패 아이콘(Fake User)을 클릭해 활성화 — 씬에 적용된 오브젝트가 없어도 데이터가 보존됩니다
2단계: 뷰포트 오브젝트 삭제
3D 뷰포트에서 테스트용 메쉬, 라이트, 카메라를 모두 선택(A)하고 삭제(X)합니다.
3단계: 고아 데이터(Orphan Data) 제거
방법 A: Clean Up 메뉴 (권장)
File > Clean Up > Recursive Unused Data를 하단 상태표시줄에 “No unused data-blocks found” 메시지가 뜰 때까지 2~3회 반복합니다. 상위 데이터를 제거하면 새로운 고아 데이터가 생성될 수 있으므로 반복이 필요합니다.
방법 B: Outliner 활용
- Outliner 패널의 드롭다운을
Orphan Data로 변경합니다. - 리스트가 비워질 때까지 우측 상단의
Purge버튼을 반복 클릭합니다.
4단계: 파일 저장 및 리버트
Ctrl + S로 저장 후 File > Revert로 파일을 다시 불러와 메모리 캐시를 완전히 초기화합니다.
외부 텍스처를 테스트에 사용했다면
File > External Data에서Automatically Pack Resources가 해제되어 있는지 확인합니다. 불필요한 이미지가.blend파일 내부에 포함되어 용량이 비정상적으로 커지는 것을 방지합니다.
Houdini skinprim / skinprimuv 데이터를 Geometry Nodes로 처리하기
Houdini에서 export된 Curves가 skinprim(face index)과 skinprimuv(parametric UV) 어트리뷰트를 가질 때, 이 값을 사용해 Skin Mesh 표면 위의 정확한 좌표를 Blender Geometry Nodes에서 재현할 수 있습니다.
Blender에는 Houdini의 primuv() 함수에 해당하는 단일 built-in 노드가 없습니다. Sample UV Surface는 글로벌 UV 맵 기준으로 작동하므로 face별 parametric UV인 skinprimuv와 좌표계가 맞지 않고, Sample Nearest Surface는 위상(topology) 정보를 무시하고 3D 공간 거리만 참조하므로 디포메이션 시 popping이 발생합니다. 따라서 쌍선형 보간(bilinear interpolation)을 노드 트리로 직접 구성해야 합니다.
Step 1: 어트리뷰트 불러오기
Curves 오브젝트에 Geometry Nodes 모디파이어를 추가하고 다음을 구성합니다.
- Object Info 노드: 타겟 Skin Mesh 오브젝트 선택,
Relative모드 권장 - Named Attribute (Integer): 이름
skinprim— face index - Named Attribute (Vector): 이름
skinprimuv— parametric UV
Step 2: Face의 네 꼭짓점 위치 구하기
skinprim이 가리키는 face의 꼭짓점 위치 P0~P3를 얻으려면 Corners of Face + Sample Index 노드를 중첩합니다.
꼭짓점 하나(예: P0)를 구하는 방법은 다음과 같습니다.
- Corners of Face 노드 추가,
Sort Index를0으로 설정 - 내부 Sample Index: Domain = Corner, Index = Corners of Face 출력, Value = Position 노드
- 외부 Sample Index: Domain = Face, Index = Named Attribute(
skinprim), Value = 내부 Sample Index 출력
Sort Index 값을 1, 2, 3으로 바꿔 P1, P2, P3를 동일하게 구성합니다. Skin Mesh가 완전한 Quad라면 (skinprim * 4) + 0/1/2/3을 계산해 단일 Sample Index (Domain: Corner)의 Index에 직접 연결하는 방법으로 단순화할 수 있습니다.
Houdini Quad 정점 순서와 UV 방향 매핑: P0=(0,0), P1=(1,0), P2=(1,1), P3=(0,1)
Step 3: 쌍선형 보간(Bilinear Interpolation)으로 표면 위치 계산
- Separate XYZ 노드로
skinprimuv의 X(U축)와 Y(V축)를 분리 - Mix (Vector) 노드 — 하단 모서리 U 방향 보간: Factor=X, A=P0, B=P1 →
Bottom_Pos - Mix (Vector) 노드 — 상단 모서리 U 방향 보간: Factor=X, A=P3, B=P2 →
Top_Pos - Mix (Vector) 노드 — V 방향 최종 보간: Factor=Y, A=Bottom_Pos, B=Top_Pos →
Final_Pos
Step 4: Curves에 적용
Set Position 노드를 Group Output 직전에 추가하고 Final_Pos를 Position 소켓에 연결합니다. 이로써 모든 curve point가 skinprim과 skinprimuv가 지시하는 Skin Mesh 표면 위 좌표로 이동합니다.
이 노드 트리는 한 번 구성한 뒤 커스텀 노드 그룹(Asset)으로 등록해 재사용하는 것이 파이프라인 측면에서 가장 견고한 방법입니다. Houdini 파이프라인에서 데이터를 Rest Position 상태로 넘기는 경우라면, Blender 내장 Deform Curves on Surface 노드 그룹을 대안으로 고려할 수 있습니다. 이 노드는 내부적으로 Rest Position 기준 nearest surface를 한 번만 계산해 바인딩을 캐싱하므로 디포메이션 추적 시 popping이 발생하지 않습니다.
Mix Node
Blender 5.0 Geometry Nodes의 Mix 노드는 두 개의 데이터를 Factor 비율에 따라 보간하는 범용 유틸리티 노드입니다. 과거 버전의 Mix RGB, Mix Vector 등 타입별 분리 노드들이 하나로 통합된 형태입니다.
Data Type 선택:
| 타입 | 용도 |
|---|---|
| Float | 두 실수값 보간 |
| Vector | XYZ 위치·방향·크기 보간 |
| Color | 두 색상 보간 (블렌딩 모드 포함) |
| Rotation | 두 회전값(Quaternion) 보간 |
Factor 동작: Factor 0.0 = 완전히 A, Factor 1.0 = 완전히 B, Factor 0.5 = 50% 혼합.
Vector 모드 특이 사항: Factor Mode를 Uniform(단일 Float)과 Non-Uniform(Vector, XYZ축 별도 비율) 중 선택 가능합니다.
Color 모드 특이 사항: Add, Multiply, Screen, Overlay 등 포토샵 방식의 블렌딩 모드를 지원합니다.
주의: Mix 노드는 데이터(속성)를 계산해 섞는 노드입니다. 실제 메시 형태(Geometry)를 한 공간에 합치려면 Join Geometry 노드를 사용해야 합니다.
Fetch and Trasfer Sample data
Sample Meaning
Blender의 Geometry Nodes(지오메트리 노드)에서 Sample이라는 단어는 쉽게 말해 “특정 위치나 대상에서 원하는 정보를 ‘가져오기(추출하기)’“라는 의미로 쓰입니다.
Sample(샘플) 넓은 영역에서 사용됩니다. 그래도 본질적인 핵심 개념은 하나로 통합니다. 바로 “전체를 다 다룰 수 없으니, 그중 일부만 뽑아서 전체를 대표하거나 파악한다”는 의미입니다
포토샵에서 스포이드 툴로 화면의 특정 부분을 콕 찍어 색상 정보를 가져오는 것(컬러 샘플링)과 같은 원리예요. 지오메트리 노드에서는 색상뿐만 아니라 위치, 노멀(방향), 인덱스 번호, 커브의 길이 등 다양한 데이터를 원하는 곳에서 쏙쏙 뽑아올 때 Sample 노드들을 사용합니다.
각 노드가 어떤 정보에서 데이터를 뽑아오는지 분류해서 보면 기능을 파악하기 훨씬 쉬워집니다. 대표적인 노드들을 묶어서 설명해 드릴게요.
-
뼈대(Curve)에서 정보 뽑아오기
- 커브(선)는 시작점부터 끝점까지 흐름이 있죠. 그 흐름 위에서 정보를 추출하는 노드들입니다.
- Sample Curve: 커브 위의 특정 위치(예: 커브의 50% 지점, 또는 시작점에서 3m 떨어진 지점)의 정확한 좌표(Position)나 방향(Tangent)을 추출합니다. 커브를 따라 오브젝트를 정렬하거나 움직이게 할 때 필수적입니다.
- Sample Bezier Curve: 베지어 커브의 핸들(조절선) 위치나 곡률 정보를 정밀하게 추출할 때 사용합니다.
-
면(Mesh)의 표면에서 정보 뽑아오기
- 이 노드들은 주로 “가장 가까운 표면”이나 “특정 표면 위”에서 정보를 가져옵니다.
- Sample Nearest Surface: 어떤 포인트에서 가장 가까운 메쉬 표면의 정보를 가져옵니다. 예를 들어, 눈(Snow) 오브젝트가 캐릭터 메쉬 표면에 딱 달라붙게 만들고 싶을 때, 캐릭터 표면의 가장 가까운 위치와 각도(노멀)를 알아내기 위해 사용합니다.
- Sample UV Surface: 3D 공간이 아니라 2D UV 좌표를 기준으로 메쉬 표면의 정보를 추출합니다. 텍스처 좌표를 기반으로 지오메트리를 변형할 때 유용합니다.
-
다른 오브젝트/인덱스에서 정보 뽑아오기
- 꼭 표면이나 커브가 아니더라도, 인덱스(번호)나 특정 그리드를 기준으로 정보를 추출하기도 합니다.
- Sample Index: 지오메트리 내의 특정 번호(Index)를 가진 점, 선, 면의 정보를 정확히 지정해서 가져옵니다. “5번 포인트의 위치를 알려줘!” 할 때 씁니다.
- Sample Volume: 3D 볼륨(안개나 연기 같은 그리드 데이터) 내부의 특정 위치에서 밀도(Density) 같은 값을 추출합니다.
💡 핵심 요약: 기능 파악을 위한 팁
- Sample 노드를 마주치면 항상 속으로 이 질문을 던져보세요.
“어디서(Where) 무엇을(What) 뽑아오려고 하는가?”
- Sample Curve ➔ 커브 위에서 위치/방향을 뽑아온다.
- Sample Nearest Surface ➔ 가장 가까운 메쉬 표면에서 위치/방향을 뽑아온다.
- Sample Index ➔ 특정 번호(인덱스)를 가진 요소에서 정보를 뽑아온다.
Resample Meaning
단어 그대로 접두사 Re-(다시)와 Sample(샘플링하다)이 합쳐진 말로, “기존에 추출했던 방식을 버리고, 새로운 기준(간격이나 개수)으로 정보를 ‘다시’ 추출하겠다”라는 뜻입니다. 앞서 이야기한 Sample(전체 중 일부를 콕 집어 추출한다)을 했음에도 다른 목적으로 인해 다시 추출하는 작업.
-
Hair Curves에서 ‘Resample’의 의미
3D 그래픽에서 머리카락(Curve)은 완벽한 아날로그 곡선이 아닙니다. 컴퓨터가 인식할 수 있도록 여러 개의 점(Control Points)이 선으로 연결된 형태죠.
여기서 헤어 커브를 Resample한다는 것은 “머리카락의 전체적인 형태(길이나 흐름)는 그대로 유지한 채, 그 머리카락을 구성하는 ‘점의 개수나 간격’을 새로 갈아엎는 것”을 의미합니다.
- 기존 데이터: 점 3개로 이루어진 뻣뻣한 머리카락
- Resample 결과: 형태는 똑같지만, 점 30개로 쪼개져 부드러워진 머리카락
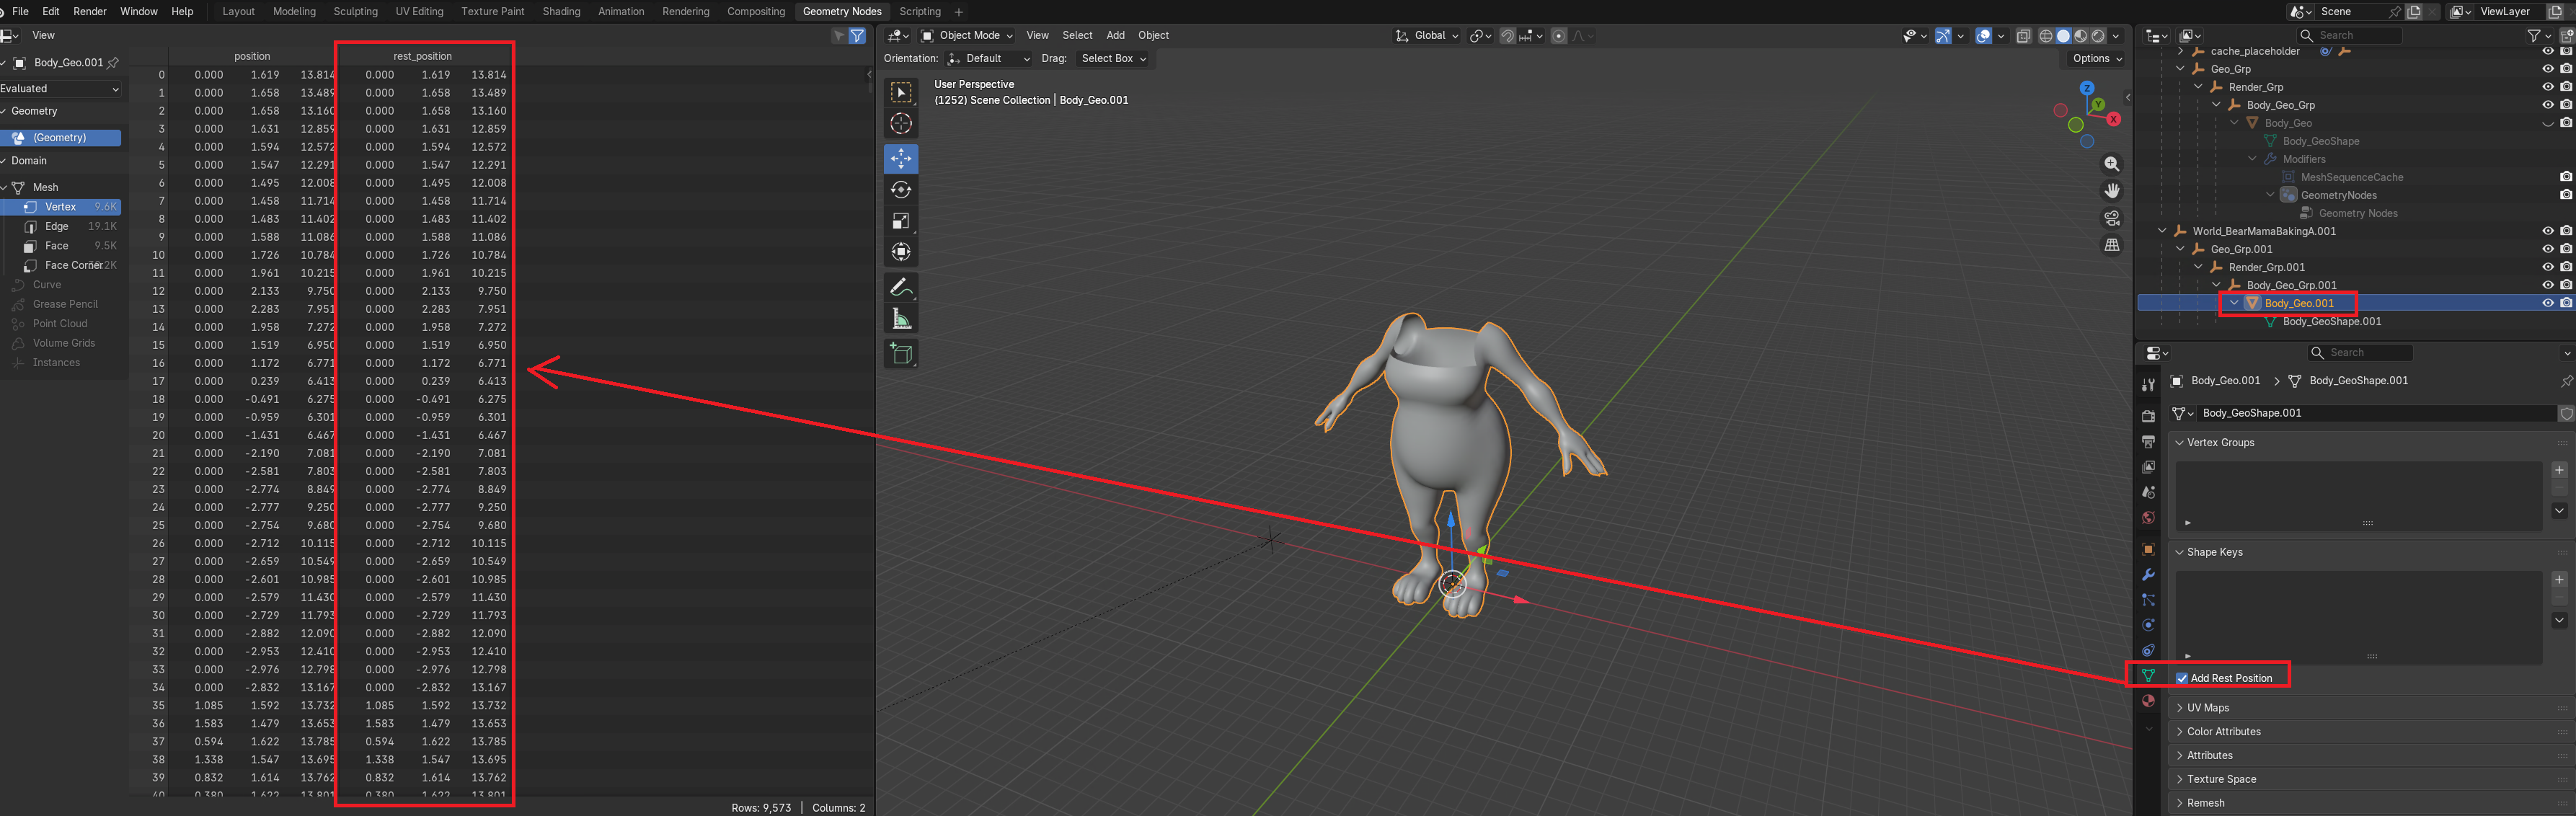
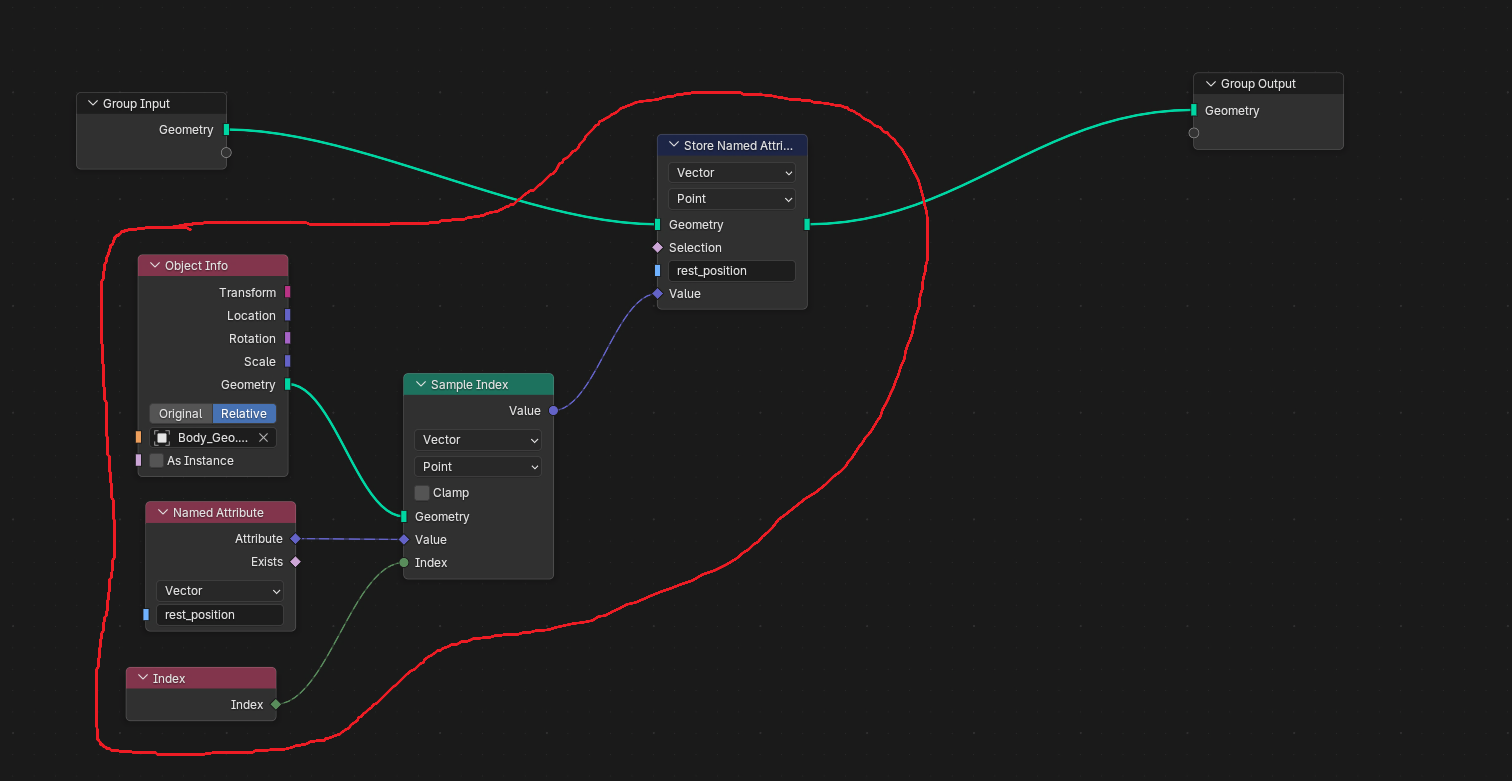
How to fetch and transfer
- bring in object by
Object Info Node - Clarify a name of sample by
Named Attribute Node - If you’d like to handle every index, use
Index Nodeif the index isn’t clarified, it will handle 0 index, it could be root point in the case of curves - Store the sample by
Store Named Attribute Node
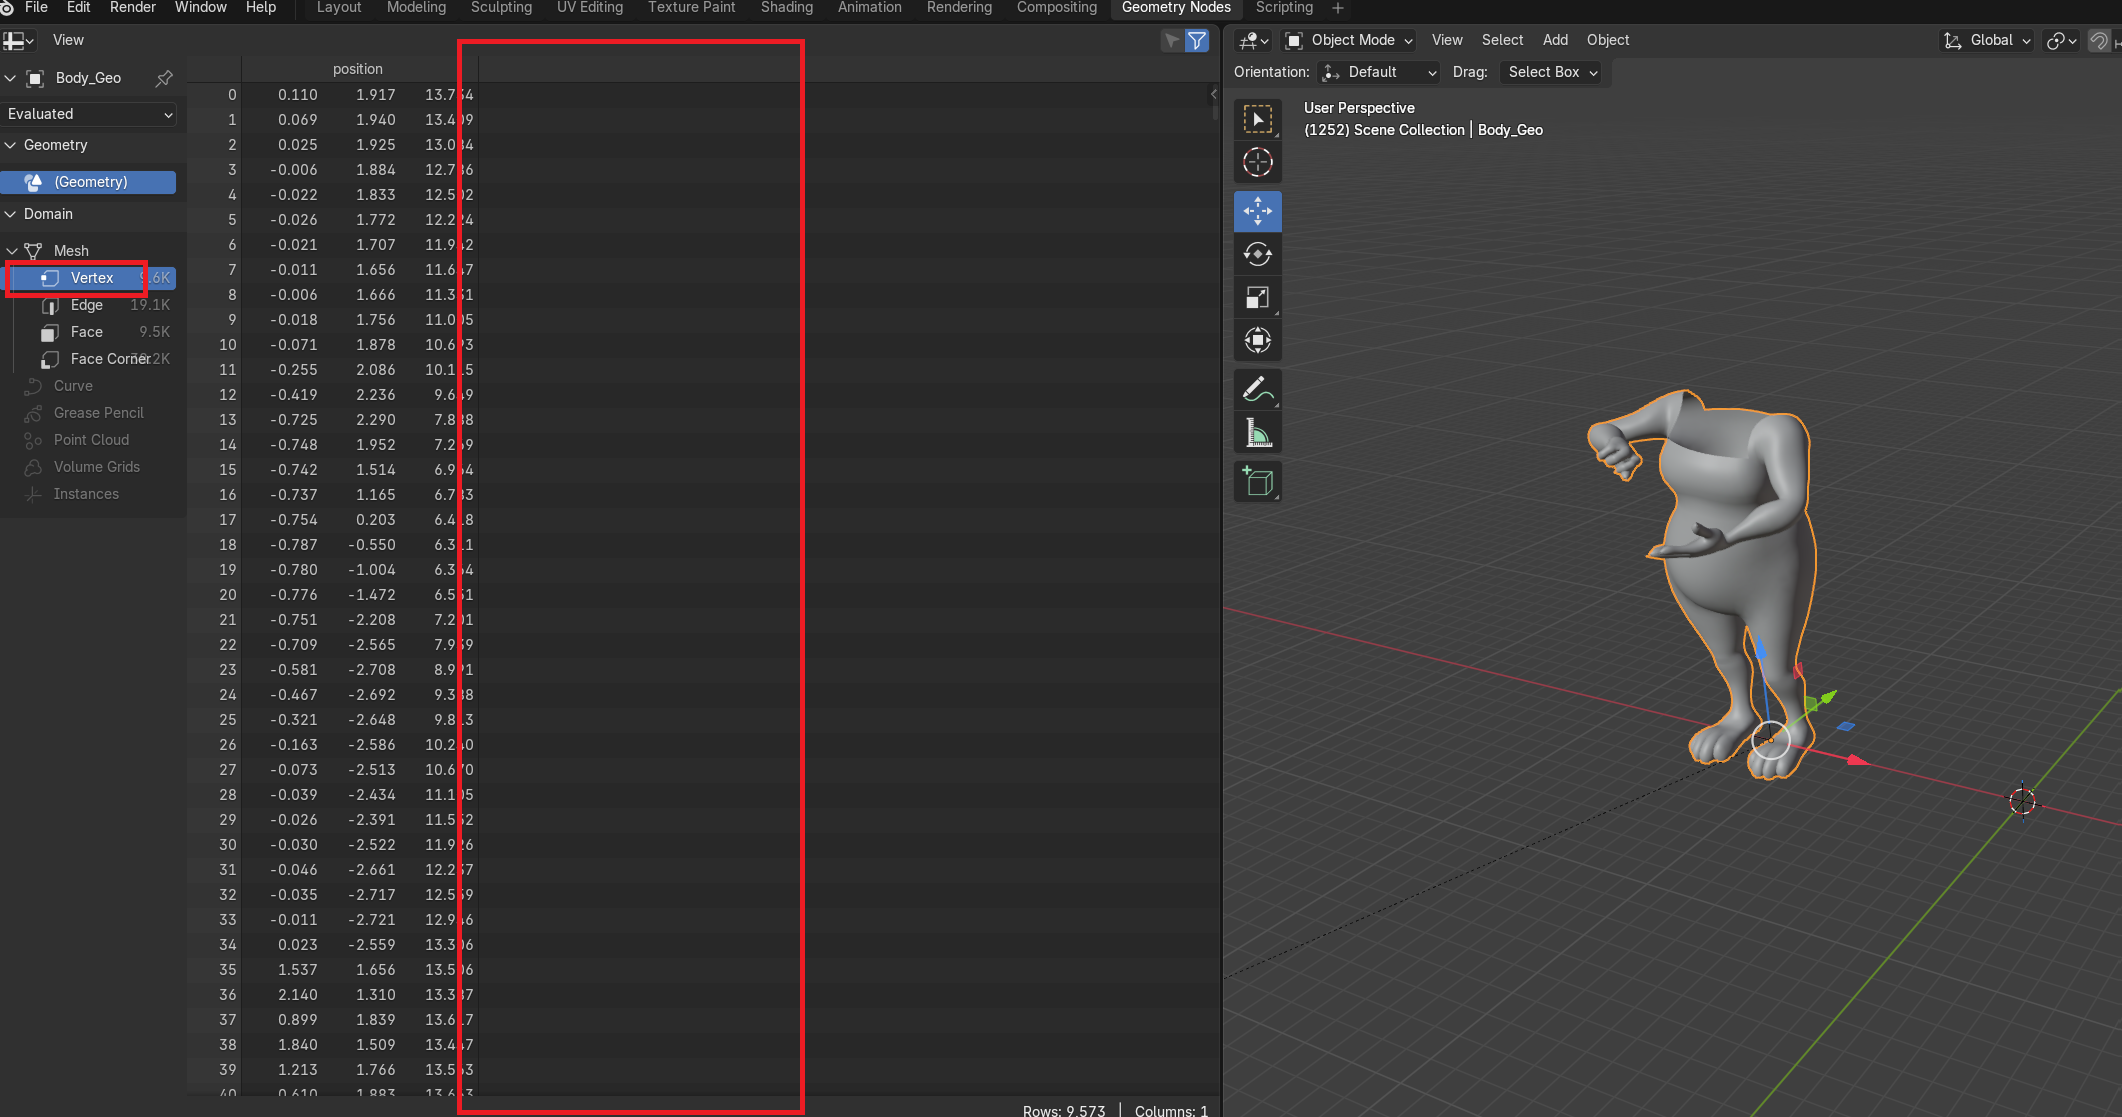
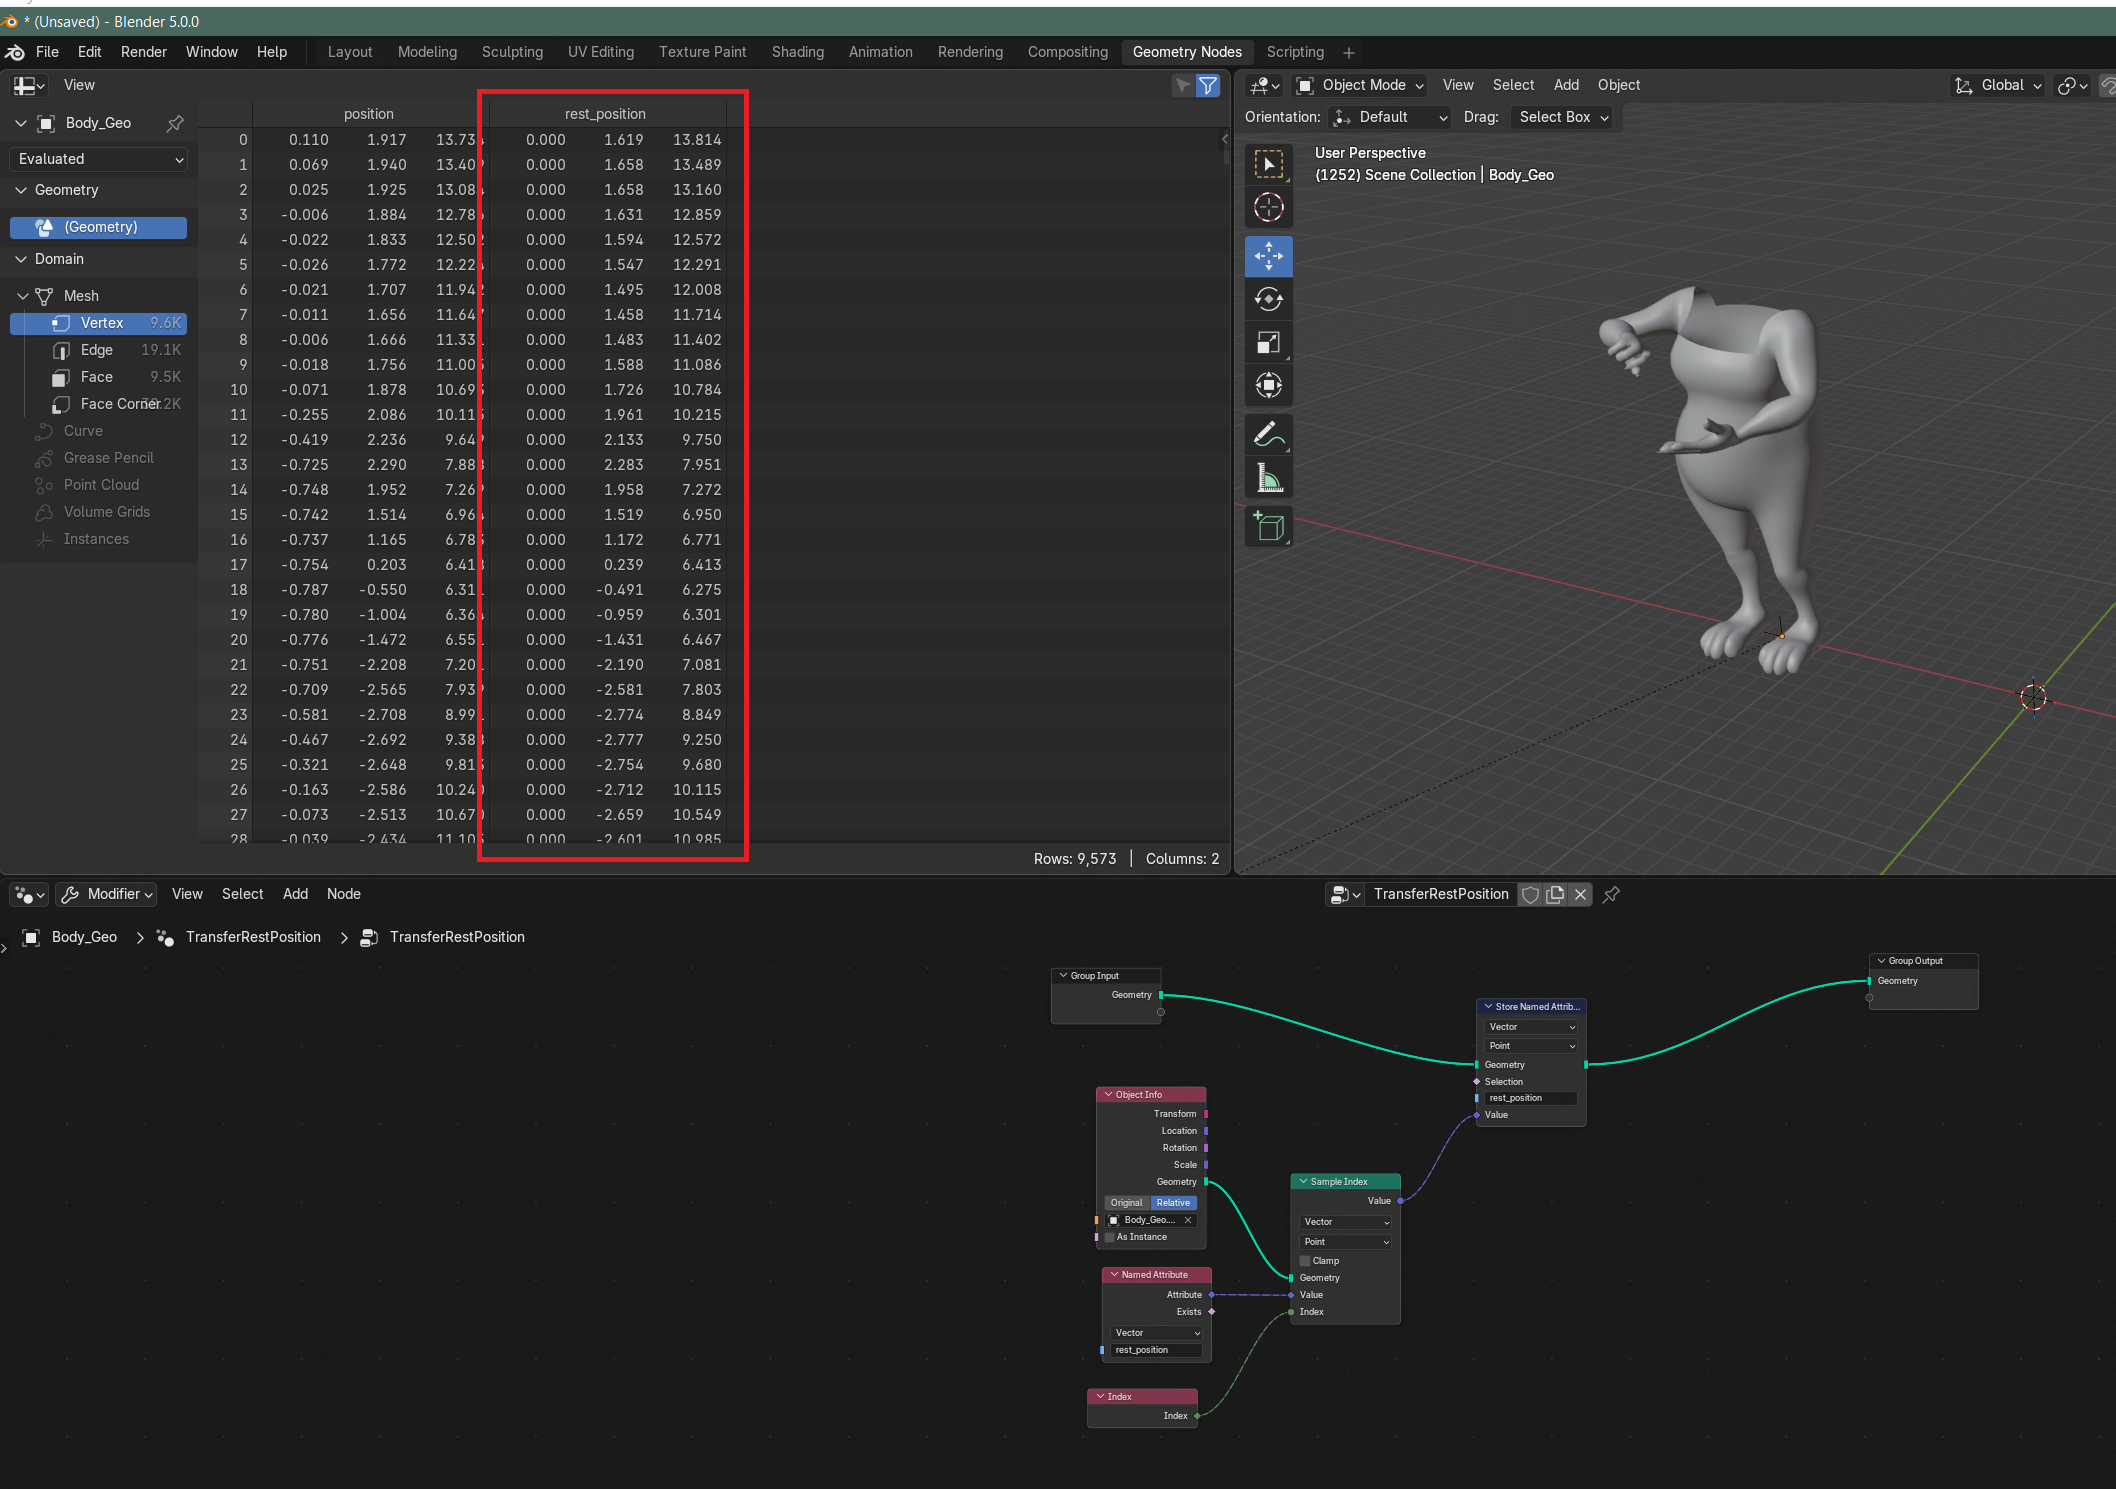
Actual Case - rest_position
Goal is to transfer rest_position values from rest mesh to animated mesh